Email Templates Membership
A Great collection of our email templates brings you more leads
Get Life Time Full Access to our products.
HTML Structure
- It contains One Email Template
- Each module has comment on top to understand the type or name module
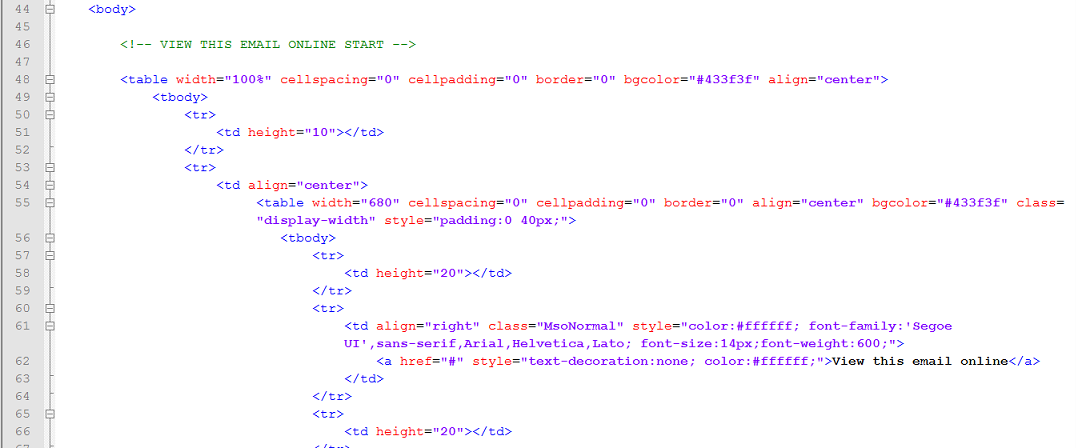
- First table is 100% width
- [Next] First nested table is 800px with "device-width" class, which controls the width of table in Responsive Mode
- Remaining nested tables are content tables
- Max. width 800px. Responsive break-points 640px, 480px.
- Body backgtound [or BG]color means background color os outer most [100% width module] table
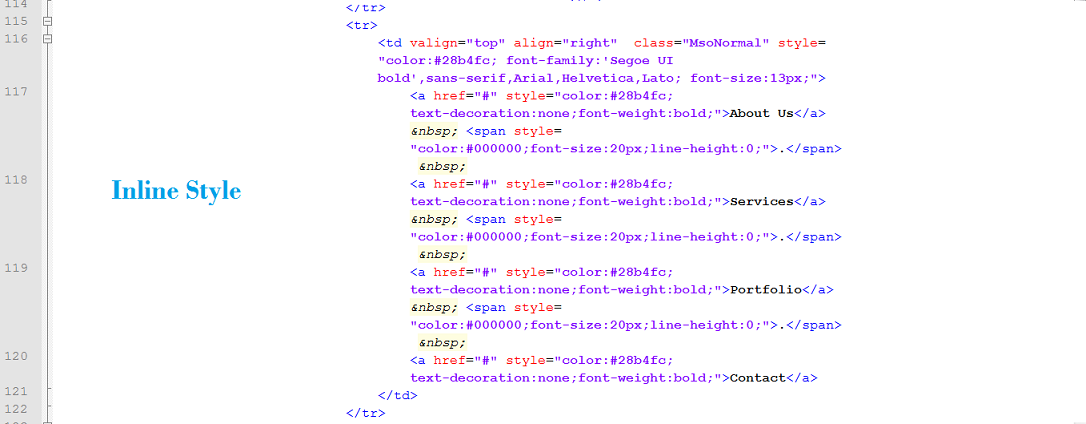
- Find the attributes in TABLE or TD to change the values or styles. For Example:
- To change with width, find table attribute " width="275" " or change the font / color find the in-line style " style="font-family:--; color:#--;" "
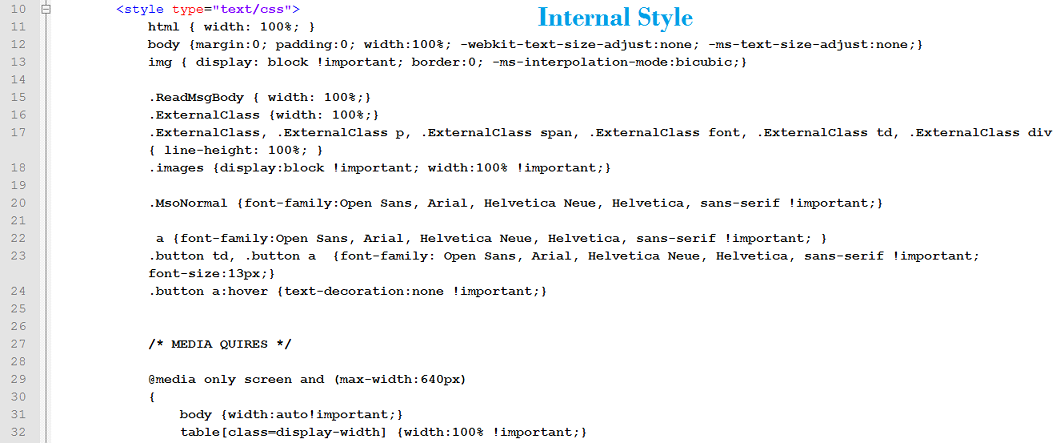
- To change the break-points of responsiveness find the internal styles in <style>..</style> tag within <head> tag.
CSS Structure
- Internal [within the <head> tag] and inline styles used
- Change the values of styles and attribues as per your requirements
HTML Files
- HTML folder contains Raw HTML, StampReady, MailChimp, Campaign Monitor and Mymail Files
- Raw HTML - HTML only file
- Pennyblack Zip file - Editable and online builder.
- StampReady - Builder ready file
- MailChimp - Editable and send using MailChimp
- Campaign Monitor - Editable and send using Campaign Monitor
- MyMail - Zip file - Editable and send using mymail
Pennyblack Online Email Builder
- What is Pennyblack Builder?
- Pennyblack Builder is online email template editing tool developed by Pennyblack Templates. It is complety FREE. You can create account from below link.
- https://www.pennyblacktemplates.com/email-builder/
How To Upload File To Pennyblack Builder?
- Method 1: Access Builder through Purchase URL
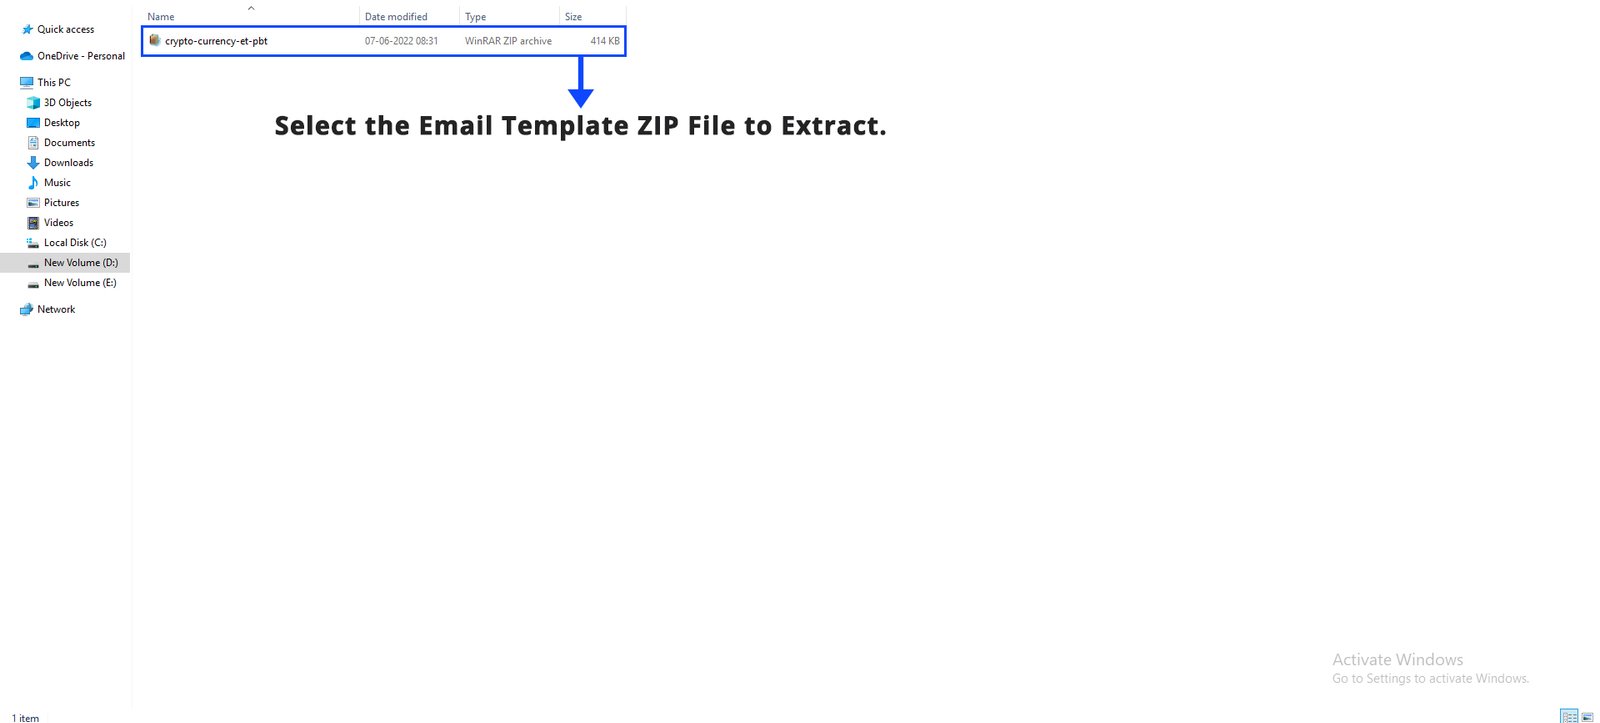
- STEP 1: Select the EMAIL TEMPLATE ZIP File to Extract.
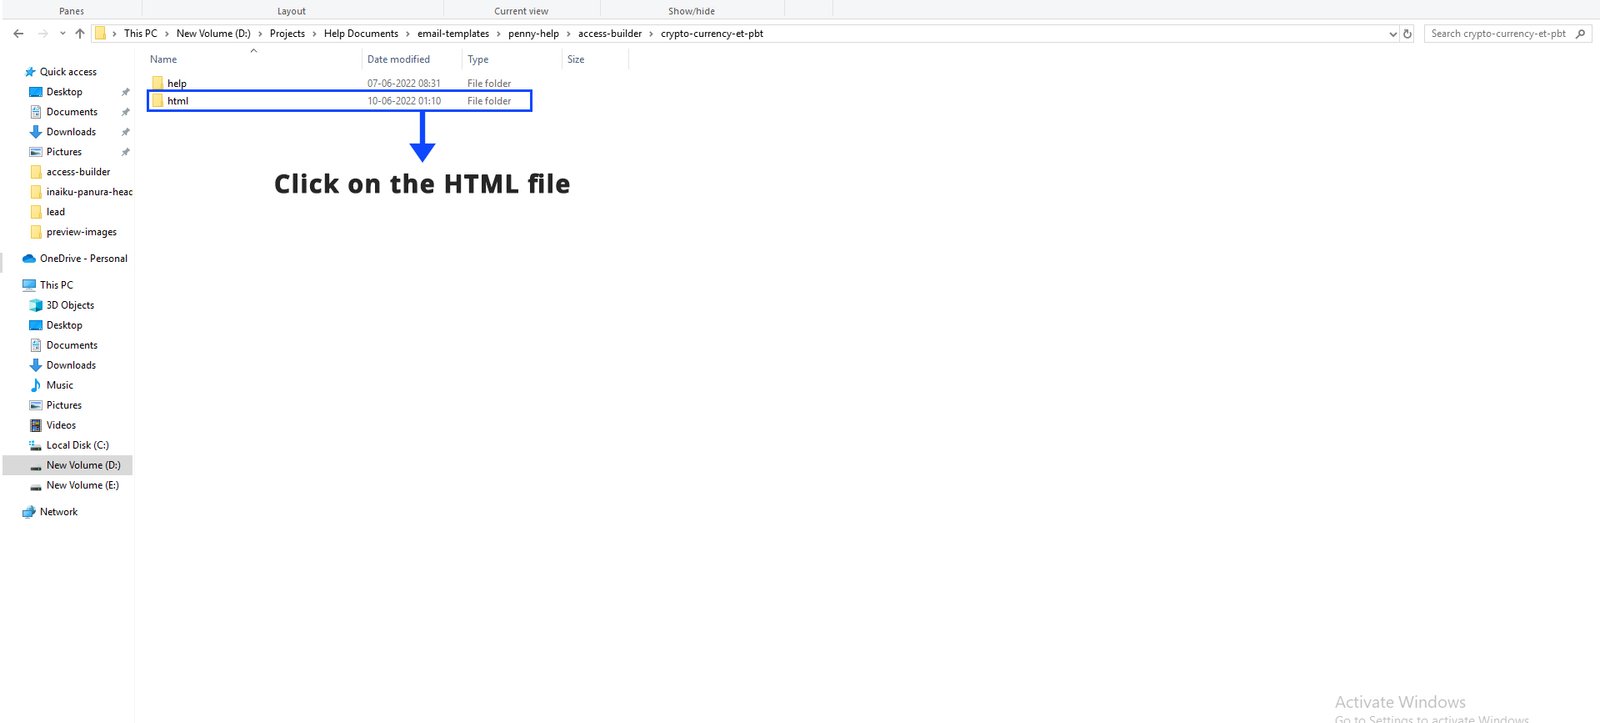
- STEP 2: Click on the HTML file
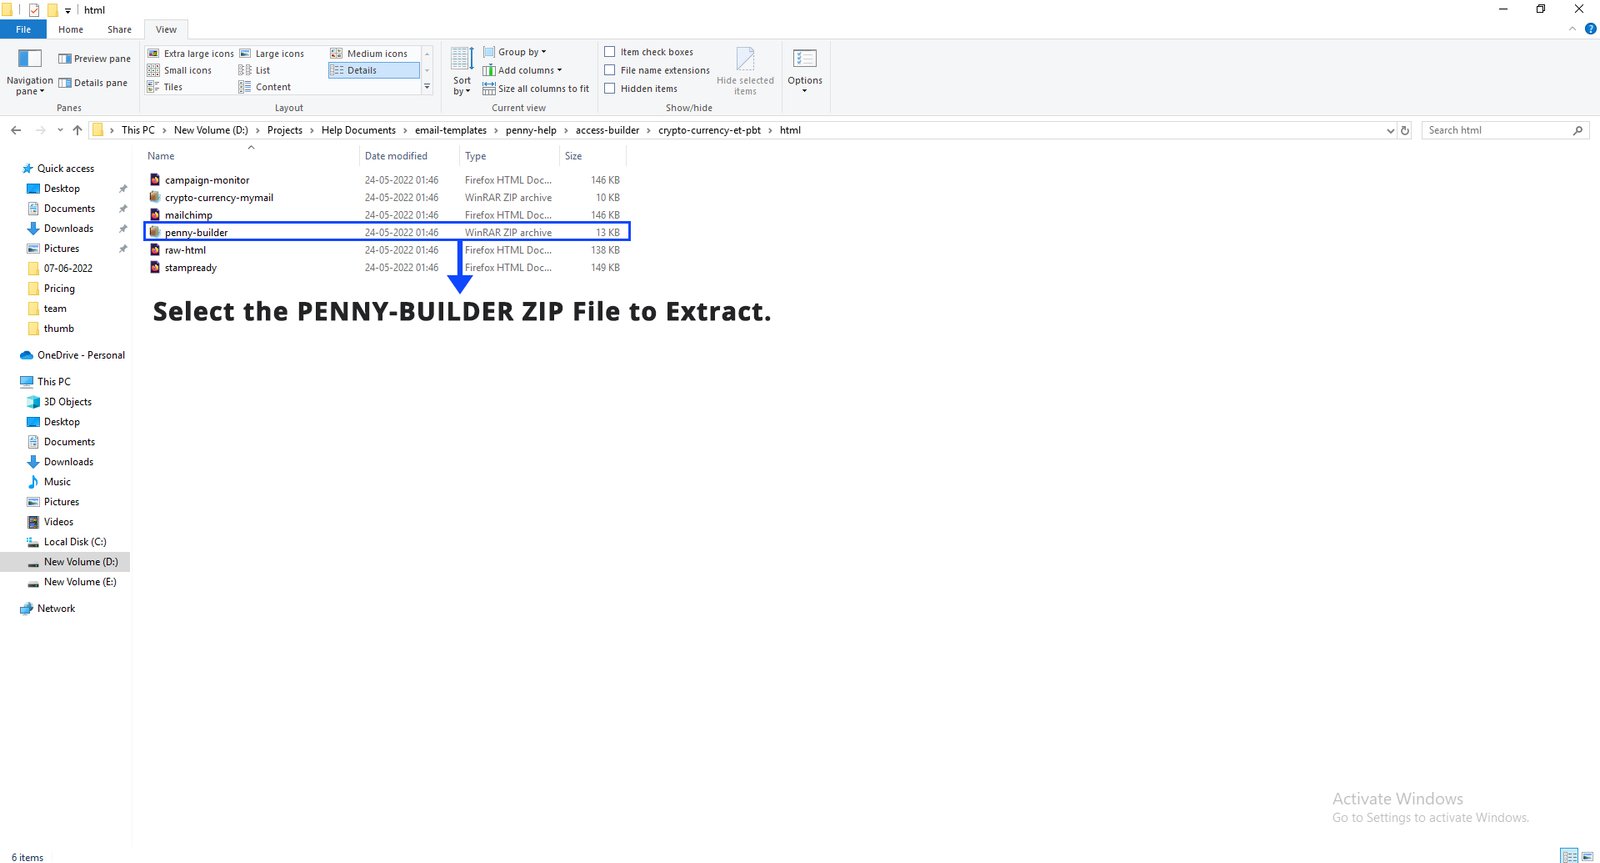
- STEP 3: Click on the PENNY-BUILDER ZIP file to extract.
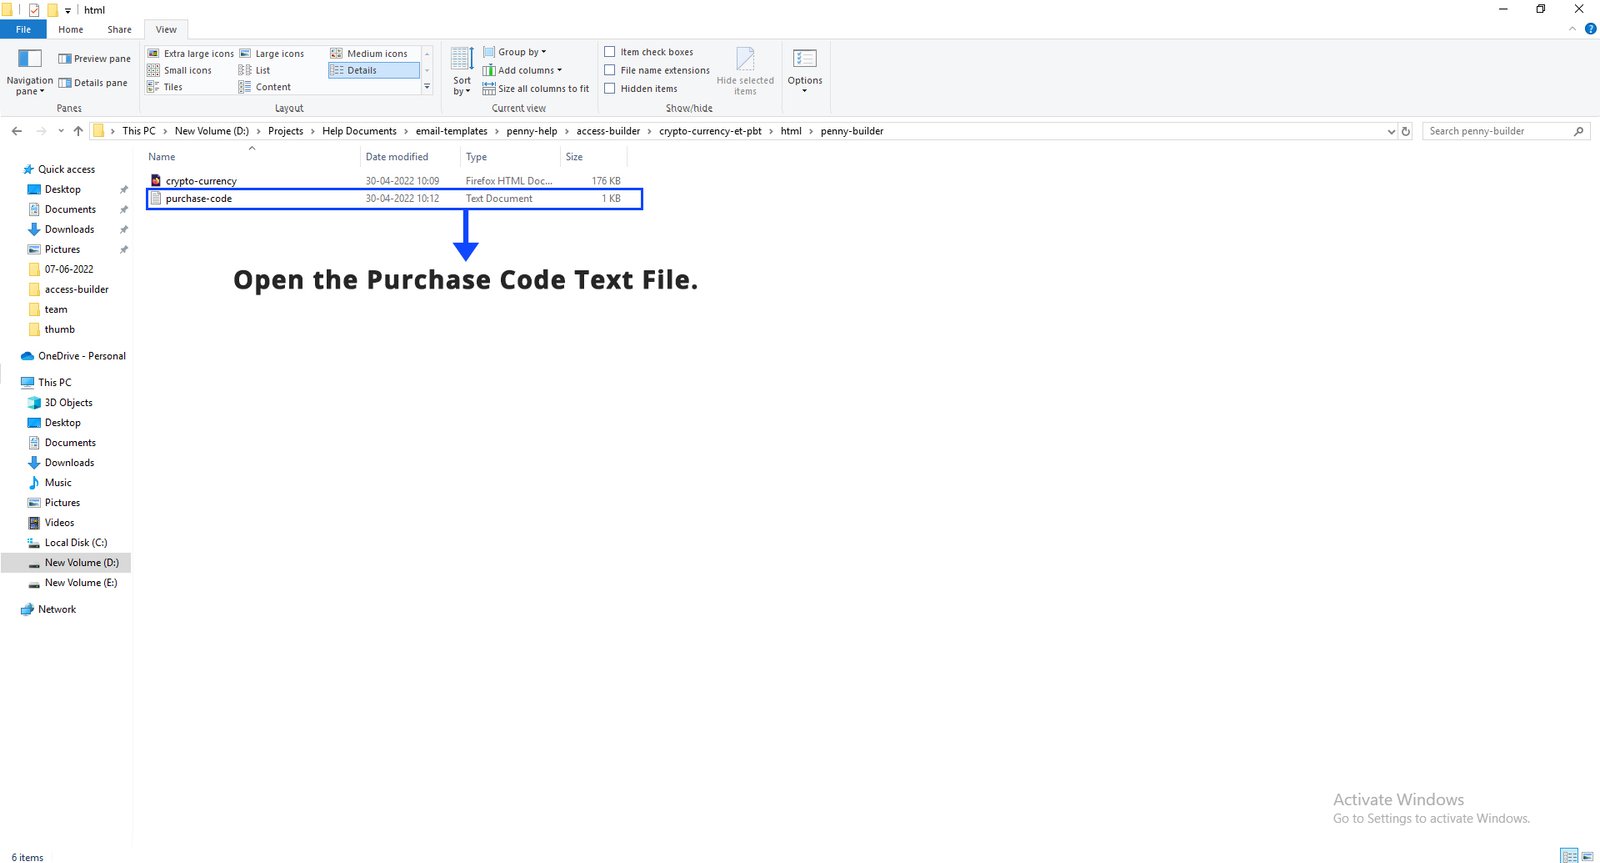
- STEP 4: Open the PURCHASE CODE TEXT FILE.
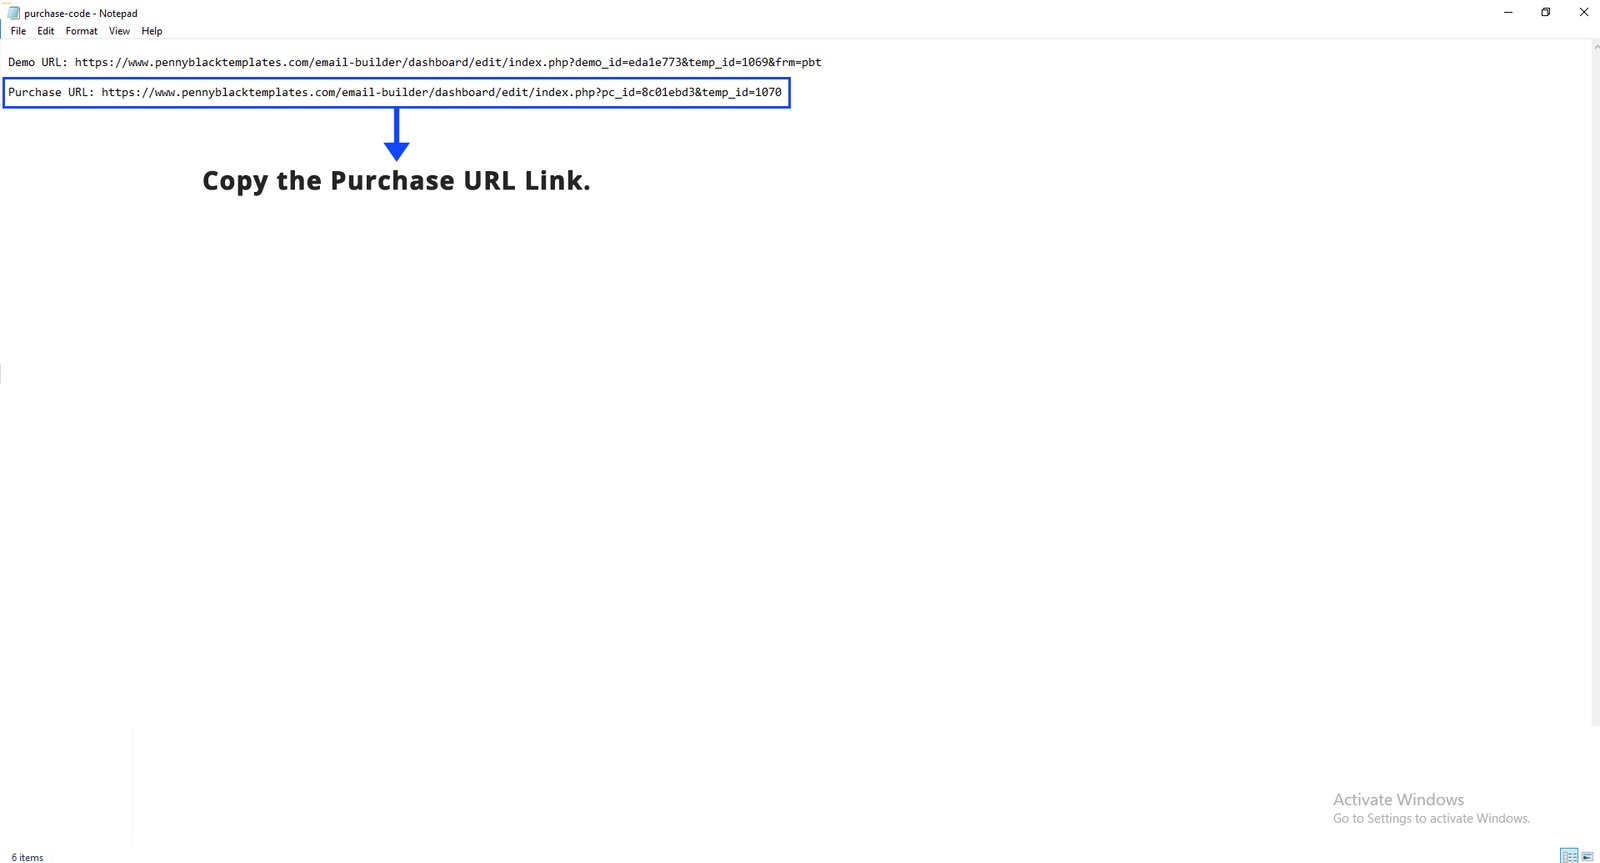
- STEP 5: Copy the PURCHASE URL LINK.
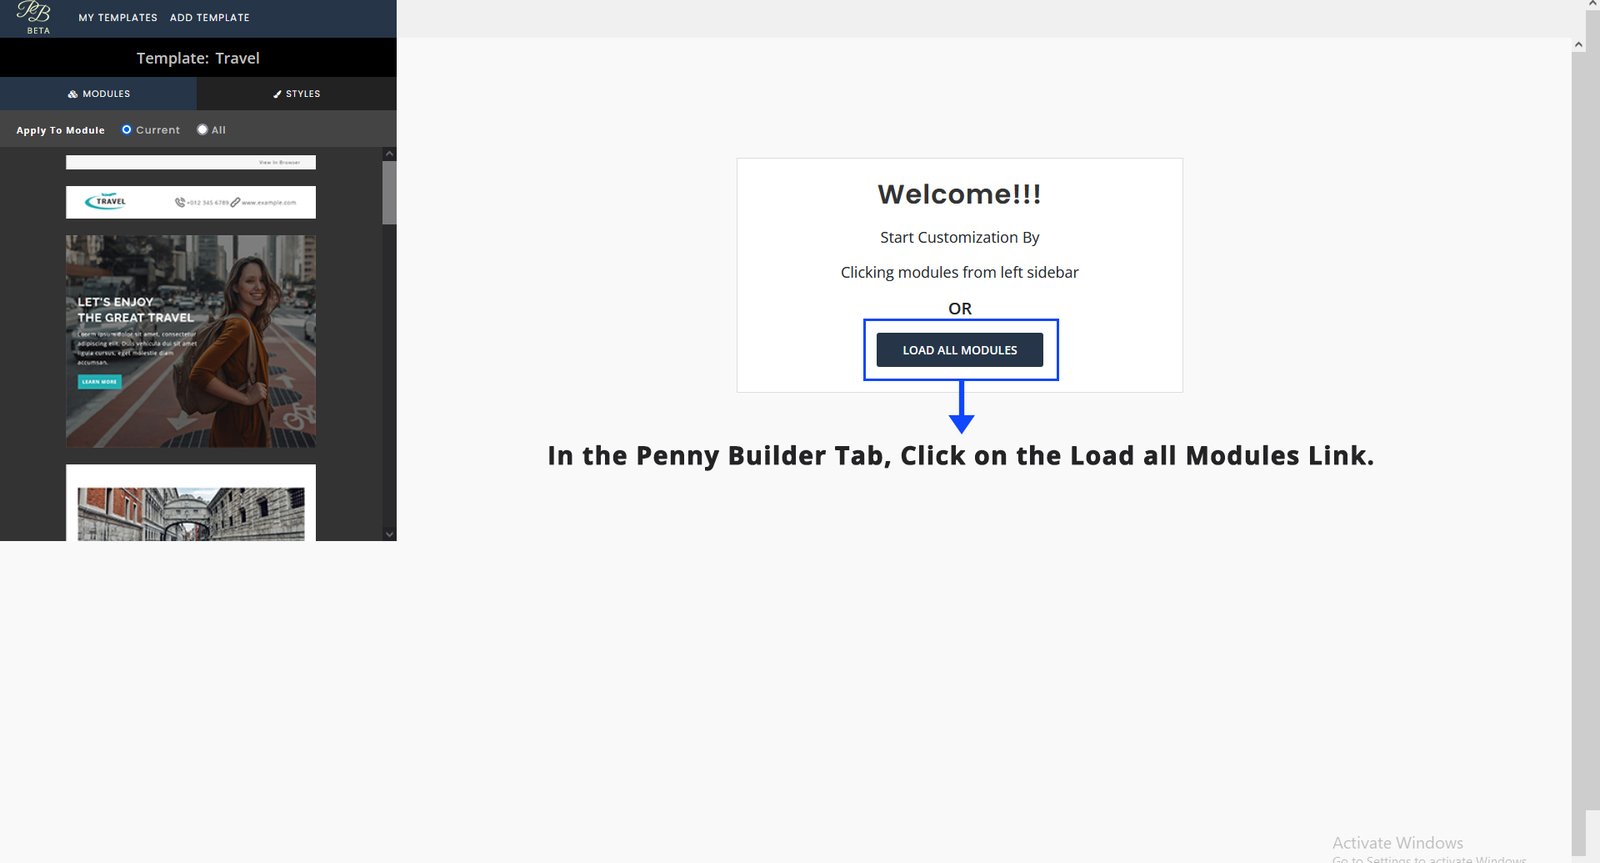
- STEP 6: In the penny builder tab, click on the LOAD ALL MODULES LINK.
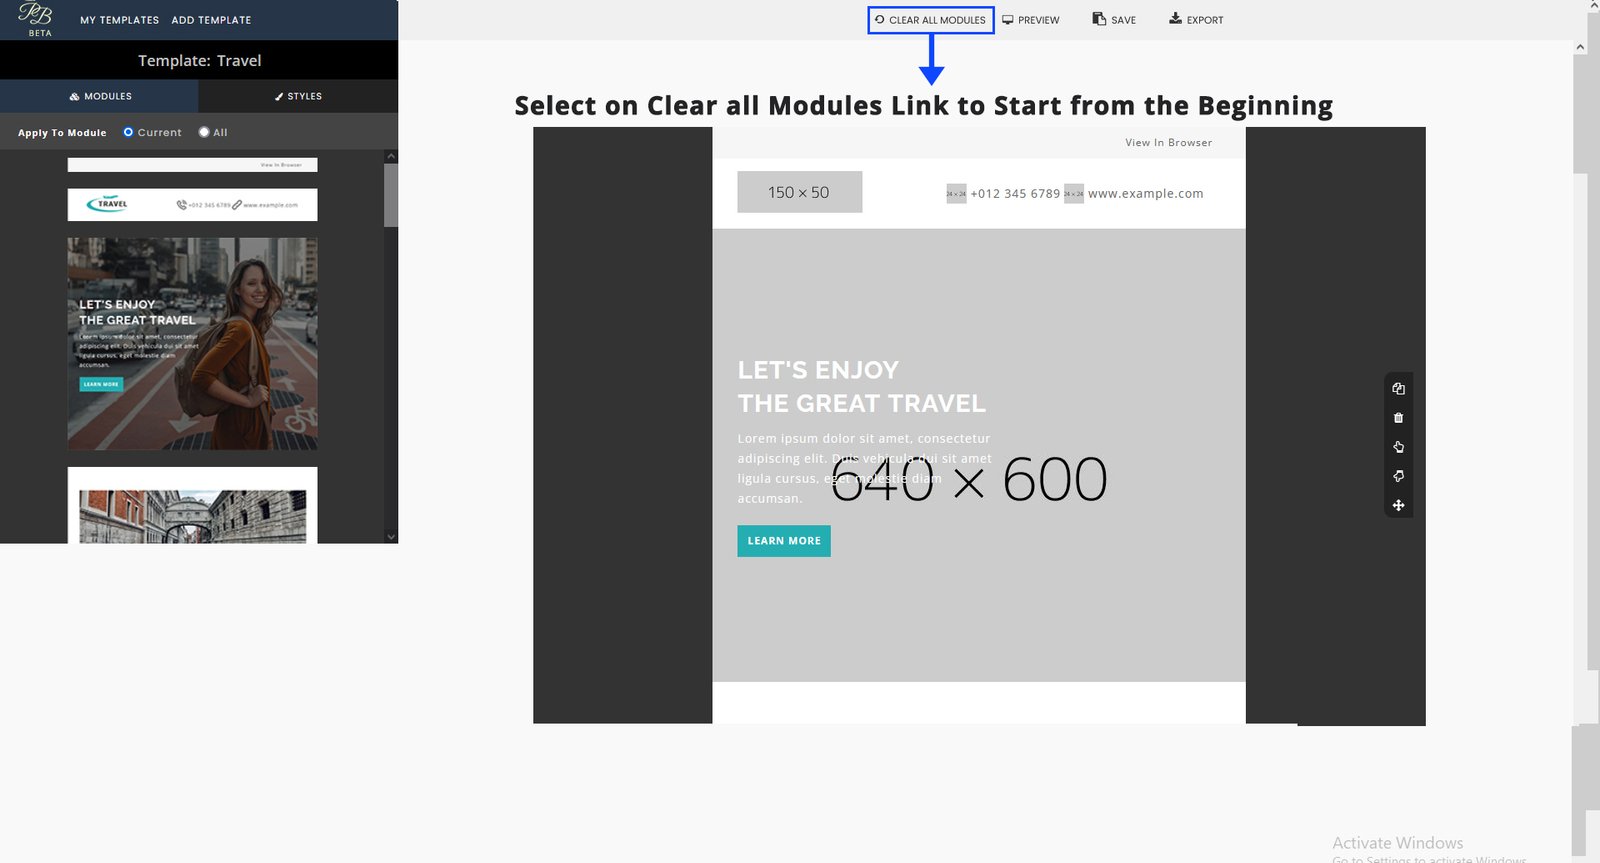
- STEP 7: Select on CLEAR ALL MODULES LINK to start from the beginning
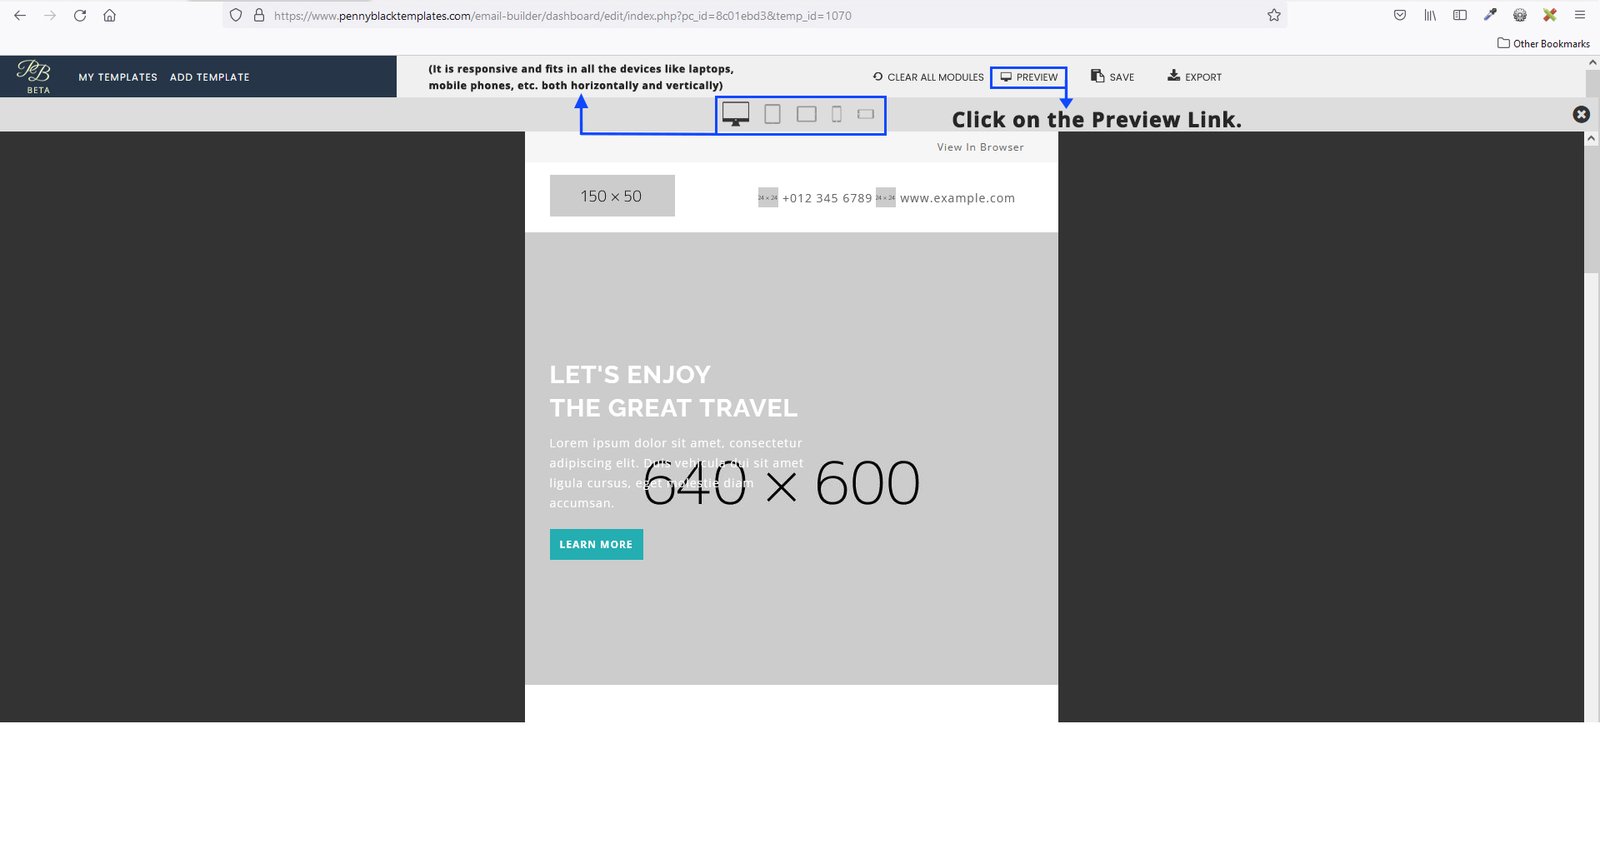
- STEP 8: Click on the PREVIEW LINK.
- (It is responsive and fits in all the devices like laptops, mobile phones, etc. both horizontally and vertically)
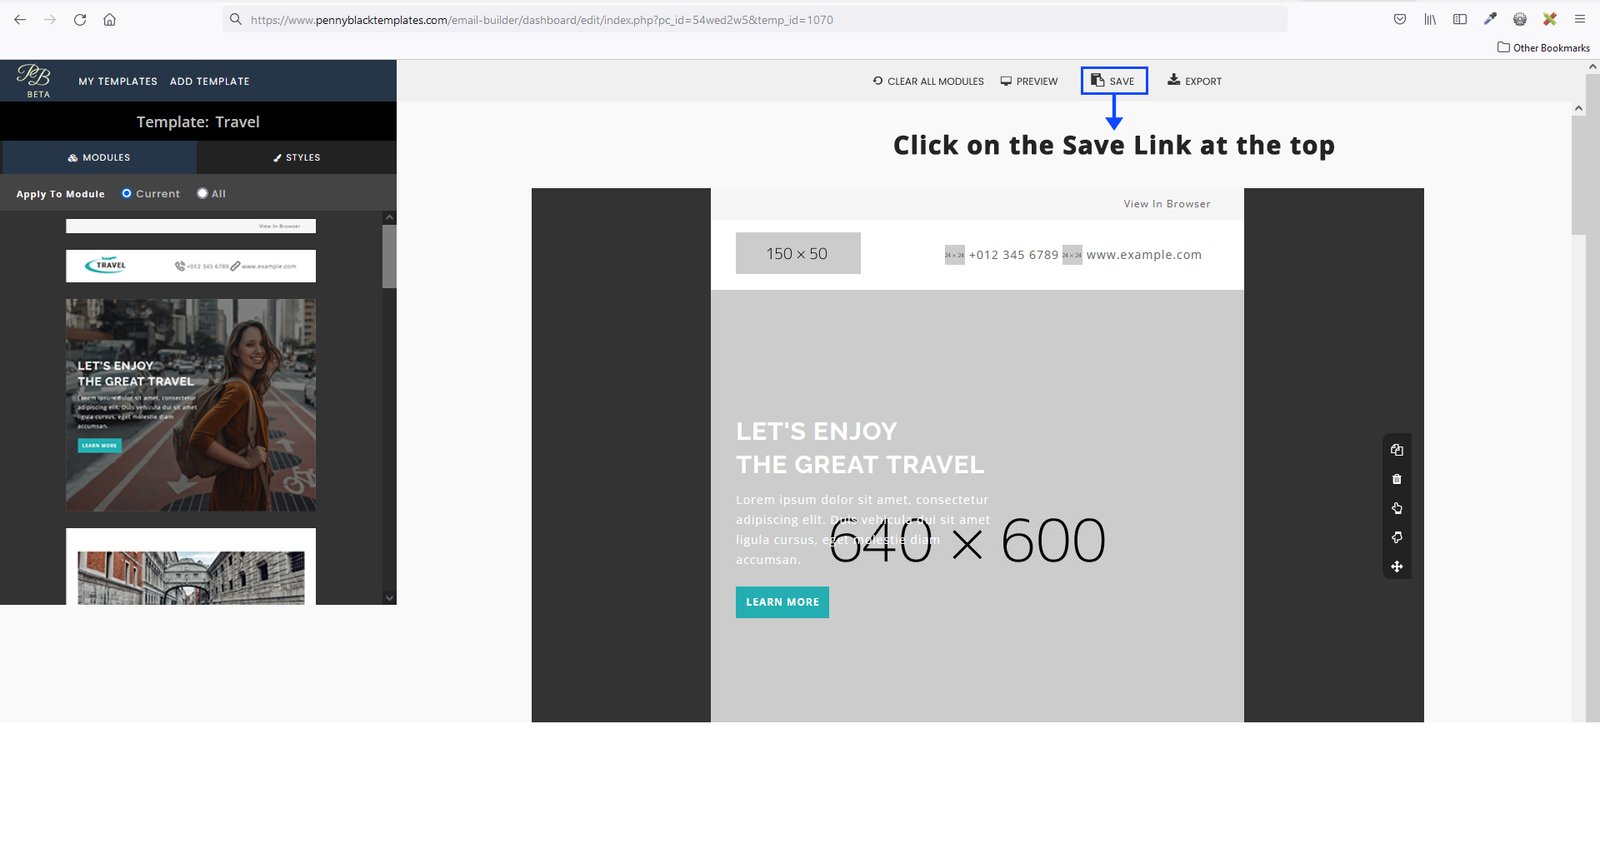
- STEP 9: Click on the SAVE LINK at the top
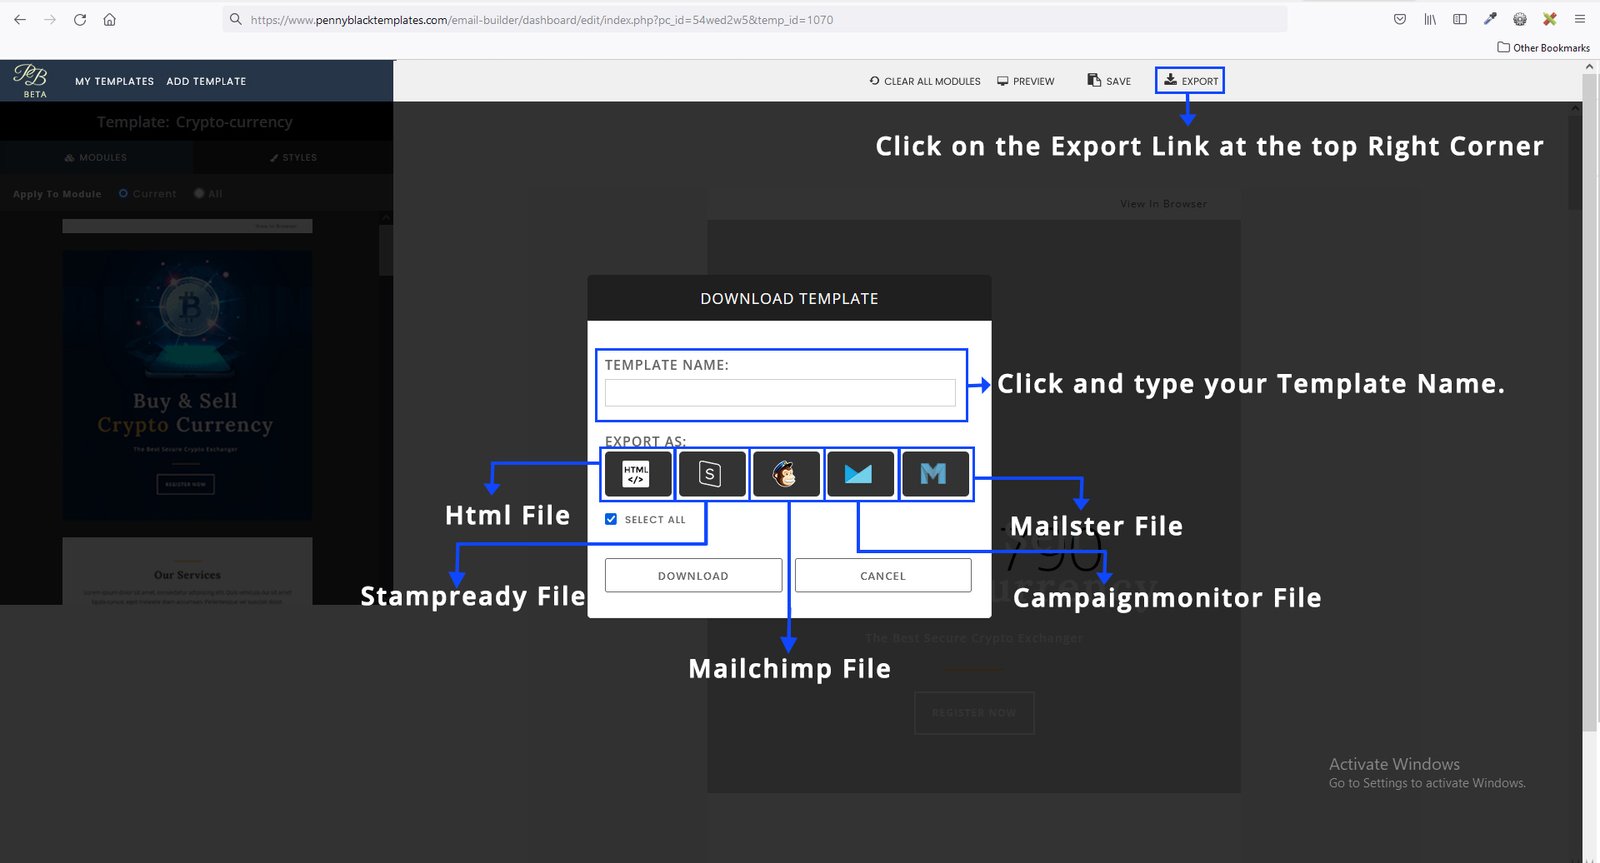
- STEP 10: Click on the EXPORT LINK at the top right corner
- In the popup bar, Click and type your TEMPLATE NAME.
- The first builder block contains an HTML FILE
- The second builder contains STAMPREADY FILE
- The third builder block contains MAILCHIMP FILE
- The fourth builder block contains CAMPAIGN MONITOR FILE
- The fifth builder block contains MAILSTER FILE (Or click on the SELECT ALL button at the bottom left corner)
-
Method 2: Upload Pennyblack Builder compatible file
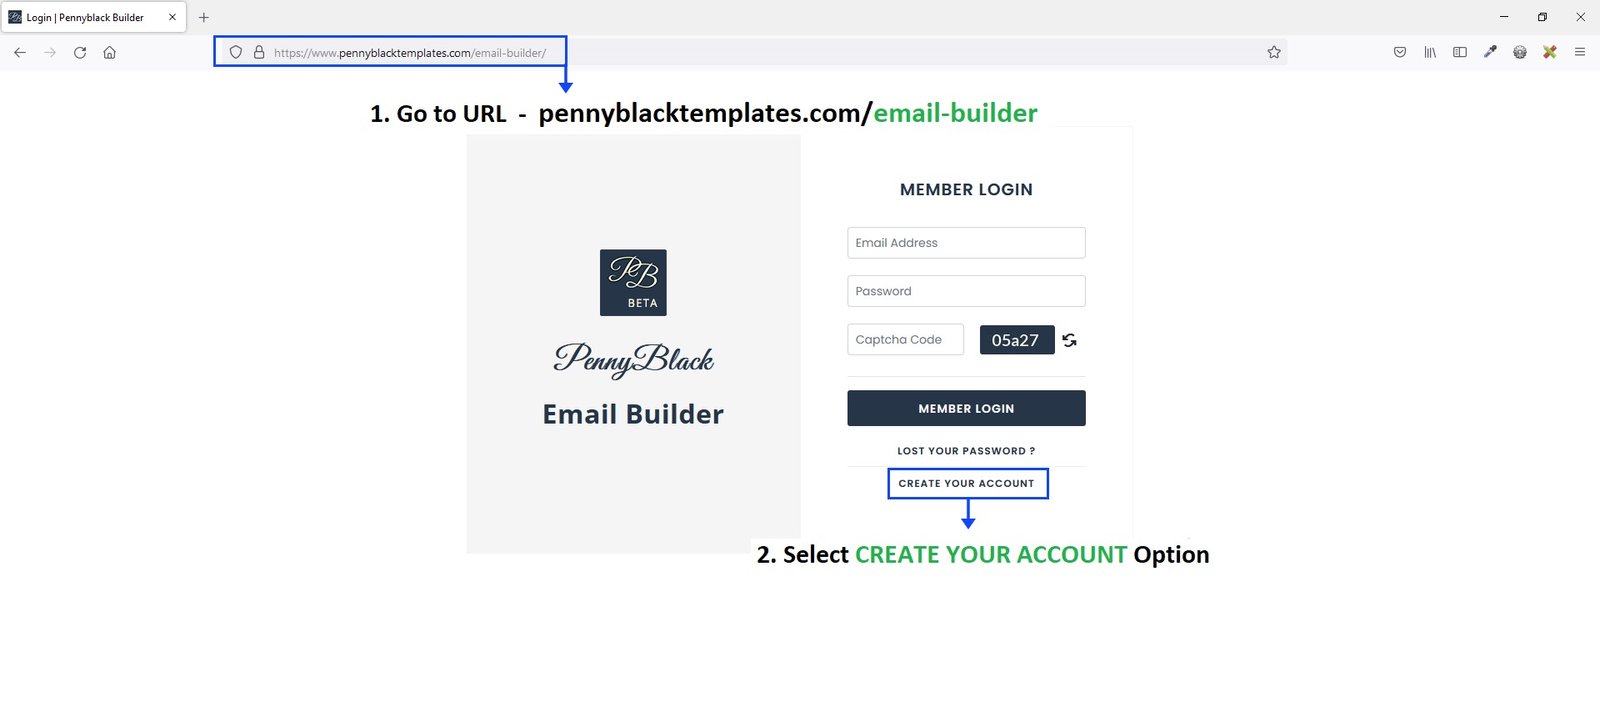
- STEP 1: Go to URL https://www.pennyblacktemplates.com/email-builder/ and select CREATE YOUR ACCOUNT option
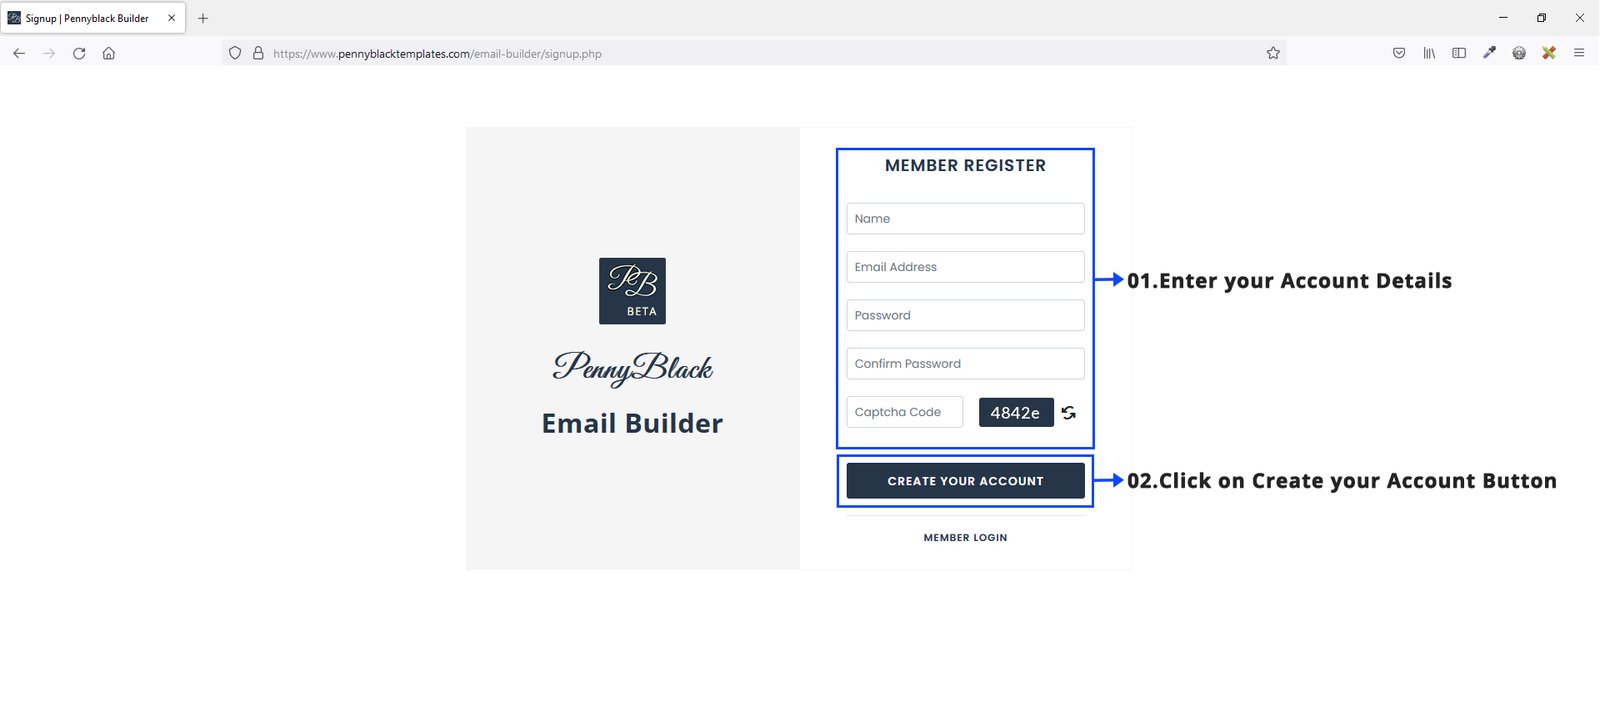
- STEP 2: Enter your details and click on CREATE YOUR ACCOUNT button
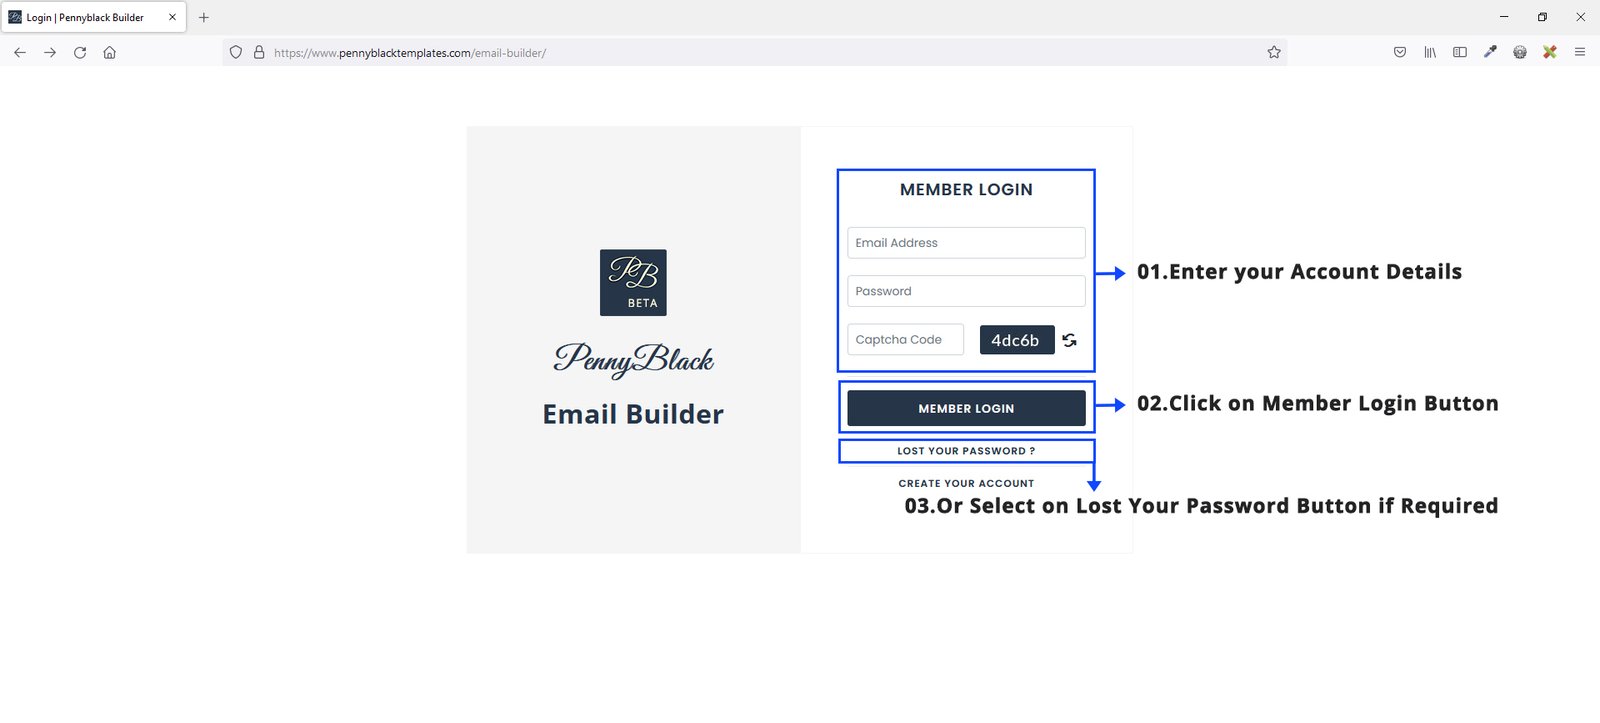
- STEP 3: Enter your details and click on MEMBER LOGIN button if existing.
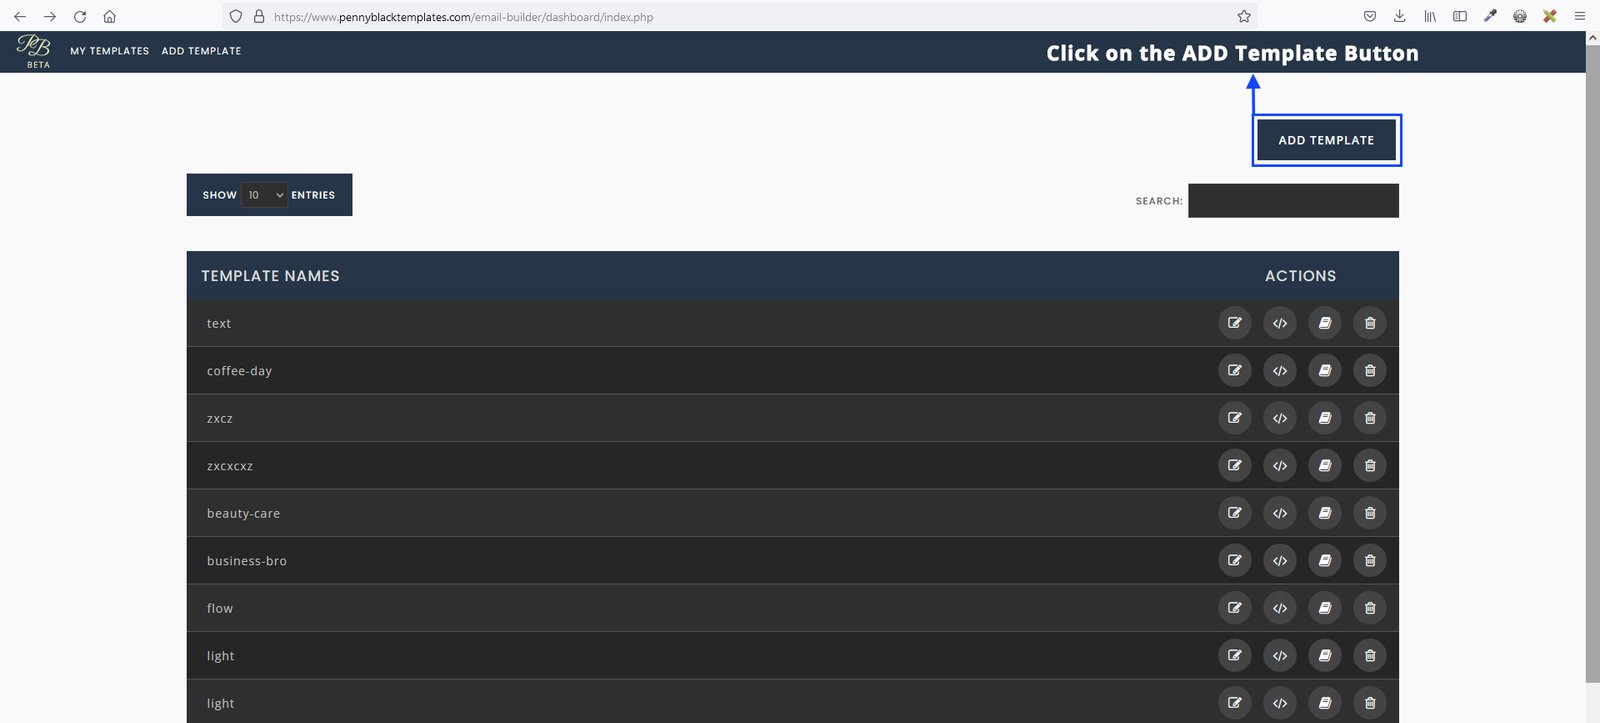
- STEP 4: Then, click on the ADD TEMPLATE button on the top right corner
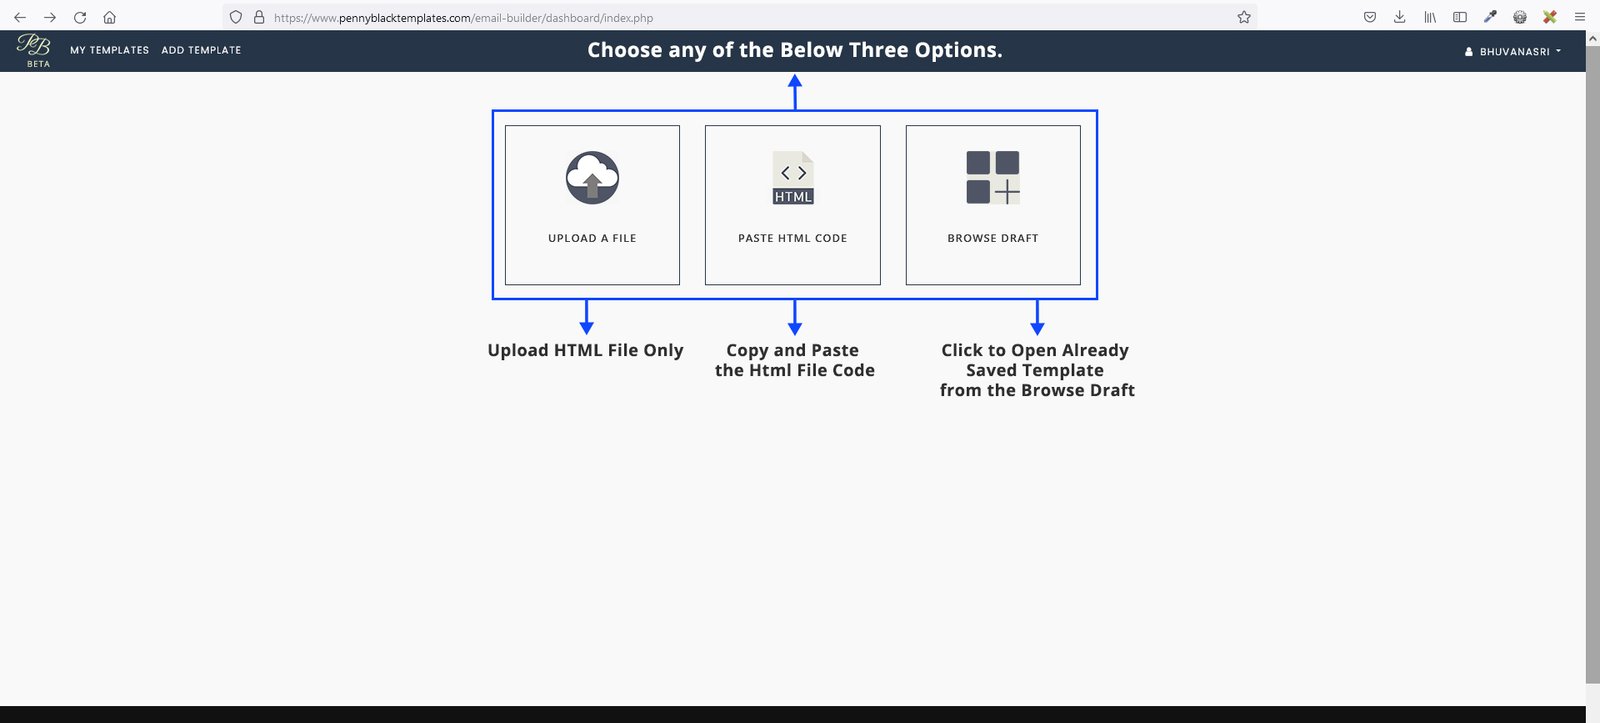
- STEP 5: You will find below three options, Choose any one of the below options
- Upload HTML FILE only
- Copy and paste the HTML FILE CODE
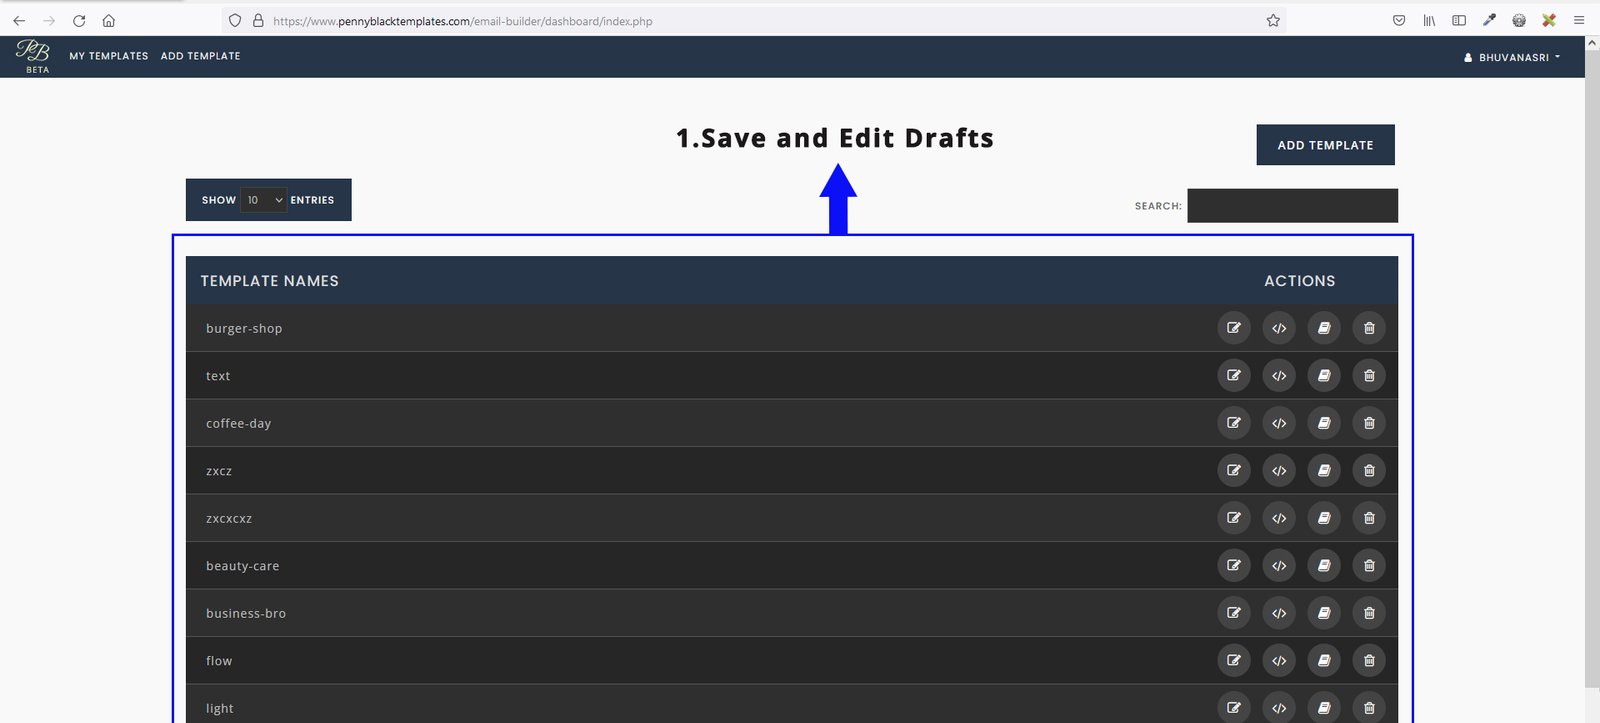
- Click to open already saved template from the BROWSE DRAFT
- Option 1:
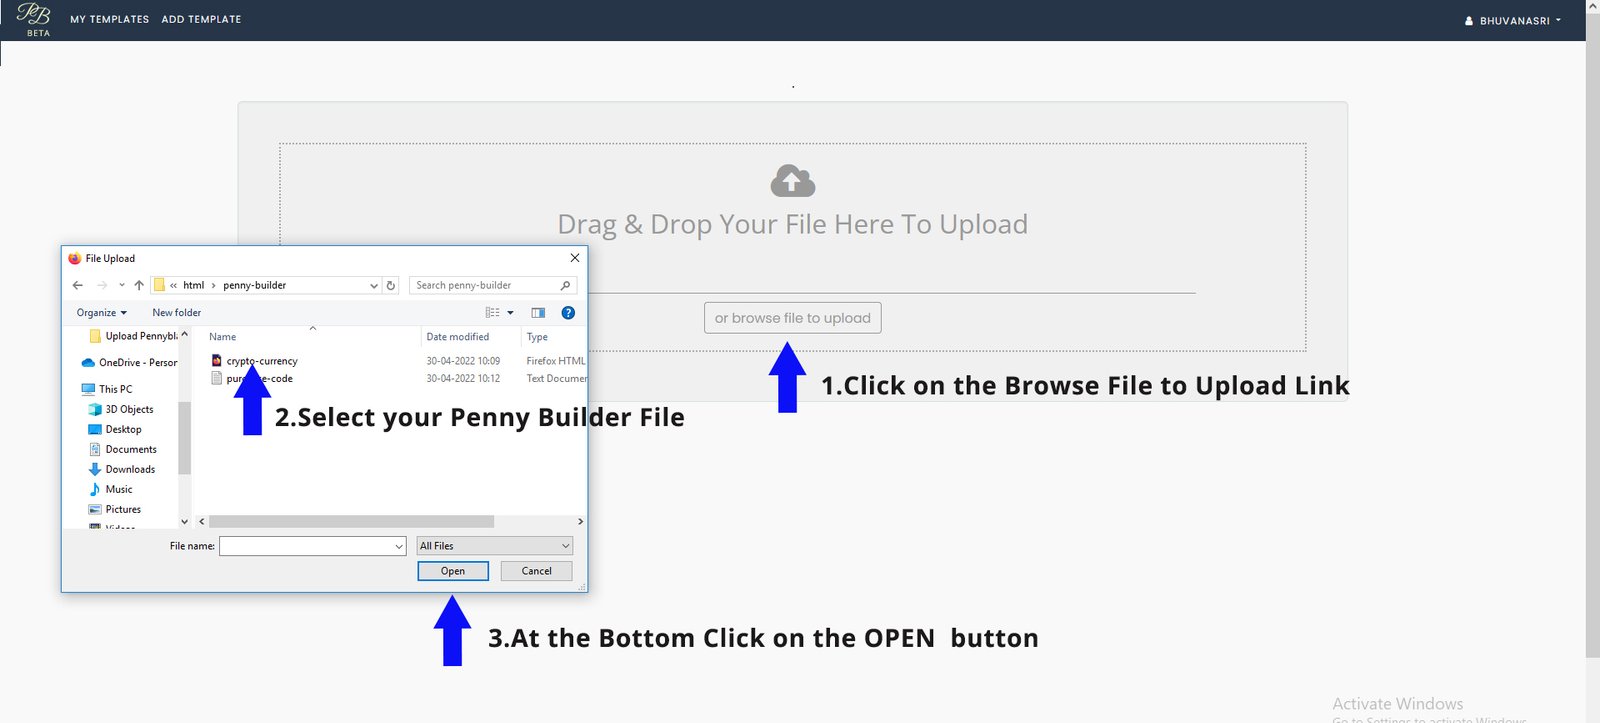
- To Upload HTML FILE, click on the BROWSE FILE TO UPLOAD link
- In pop-up bar select your PENNY BUILDER FILE
- At the bottom click on the OPEN button
- Option 3:
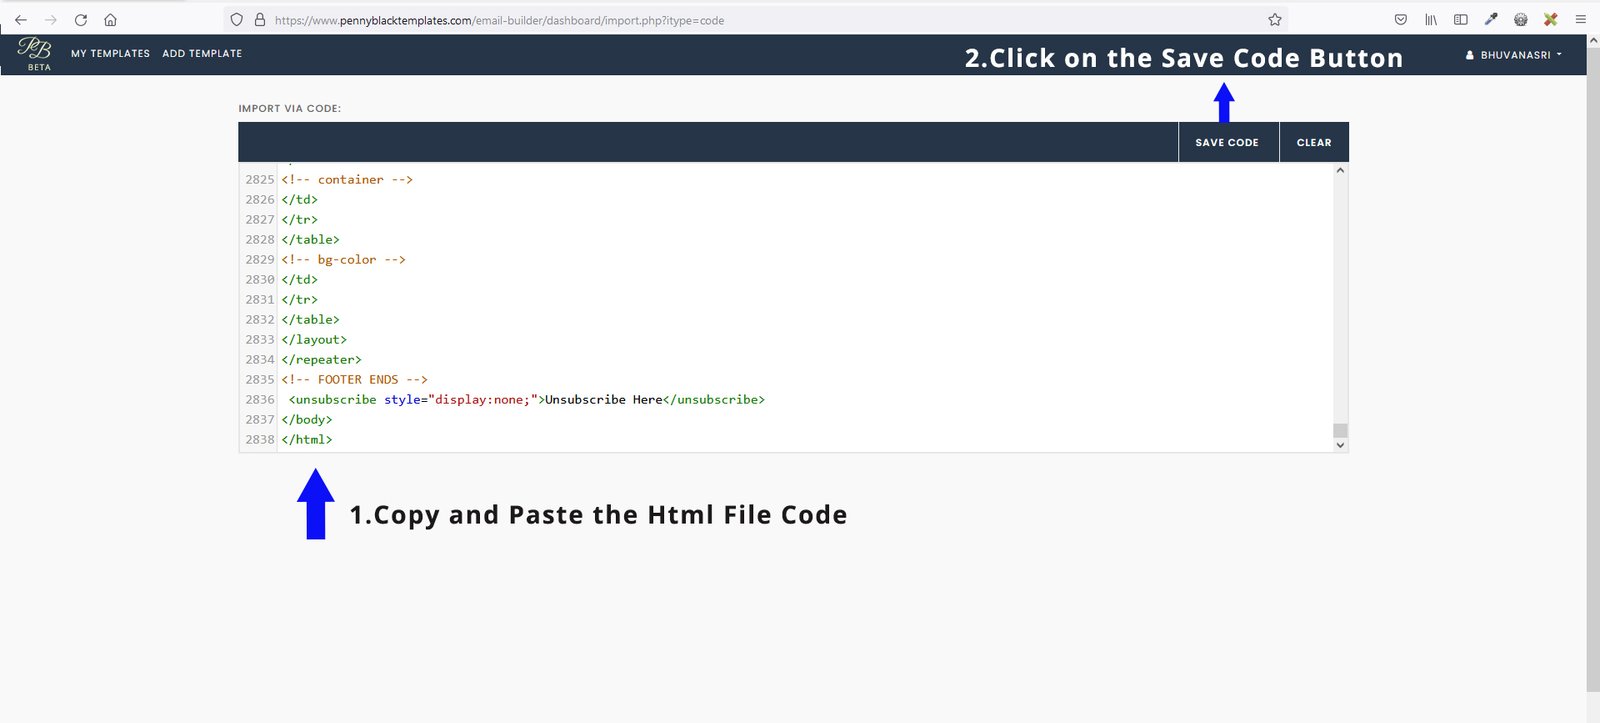
- To paste the HTML FILE CODE, click on the SAVE CODE button on the top right corner
- Option 3:
- To select your TEMPLATE, Click to open already saved template from the BROWSE DRAFT
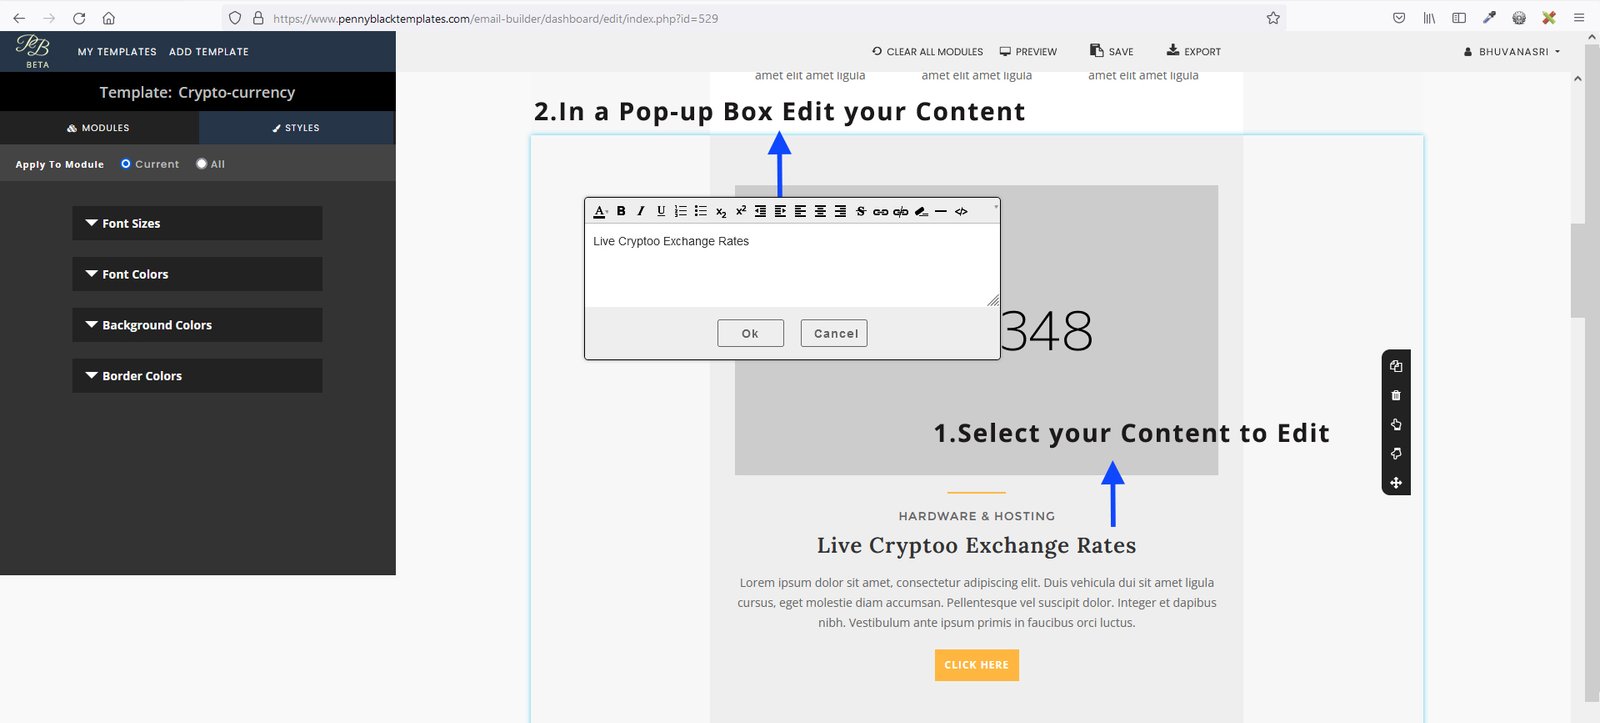
How To Edit Text Content?
- Firstly, select your CONTENT to edit
- Then in a pop-up box modify your content, and then click on the OK button
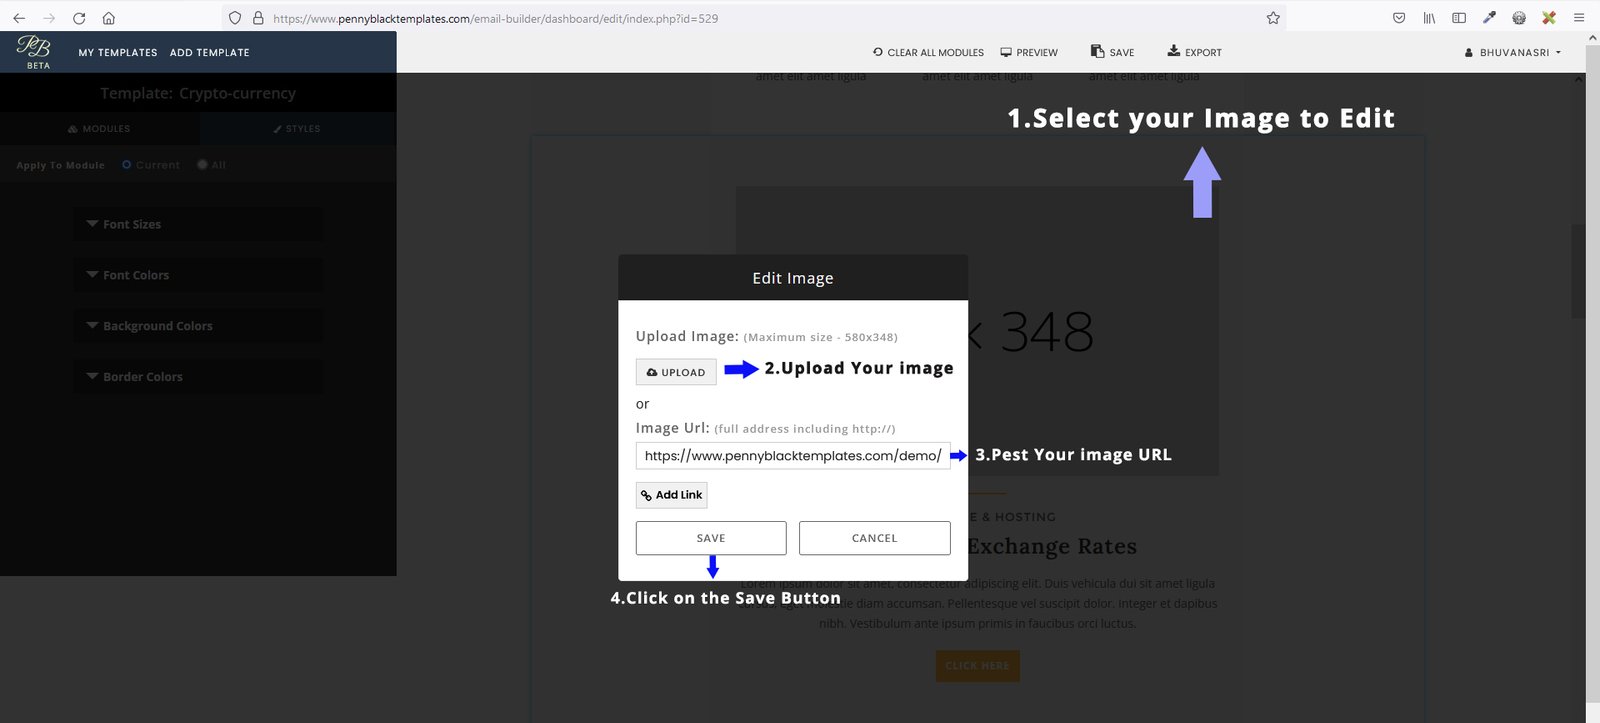
How To Edit Images?
- Firstly, select your IMAGE to edit
- Then in a pop-up box UPLODE your new image or paste the IMAGE URL link, and then click on the SAVE button
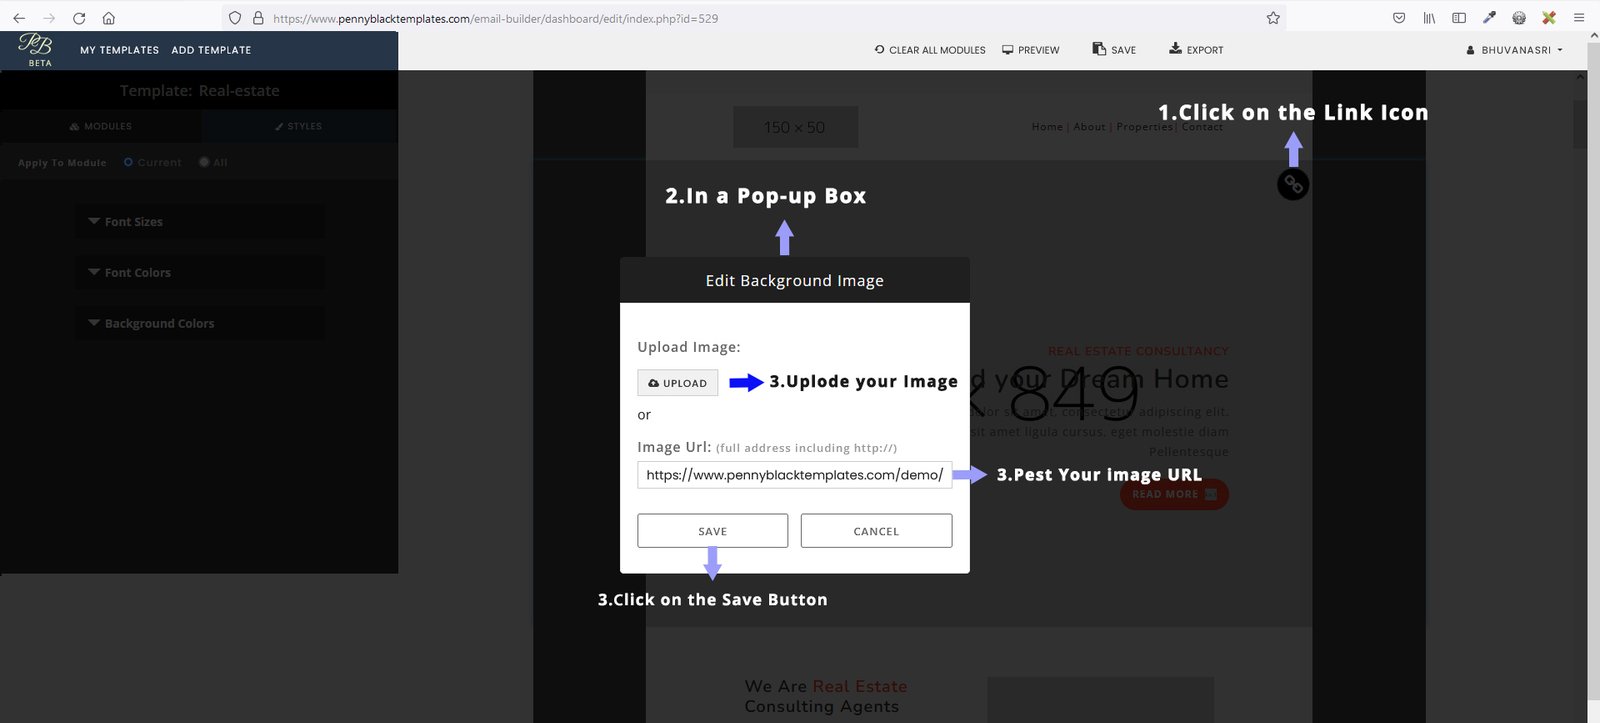
How To Edit The Background Image?
- Click on the LINK ICON on the top right corner to edit BACKGROUND IMAGE
- Then in a pop-up box UPLODE your new image or paste the IMAGE URL link, and then click on the SAVE button
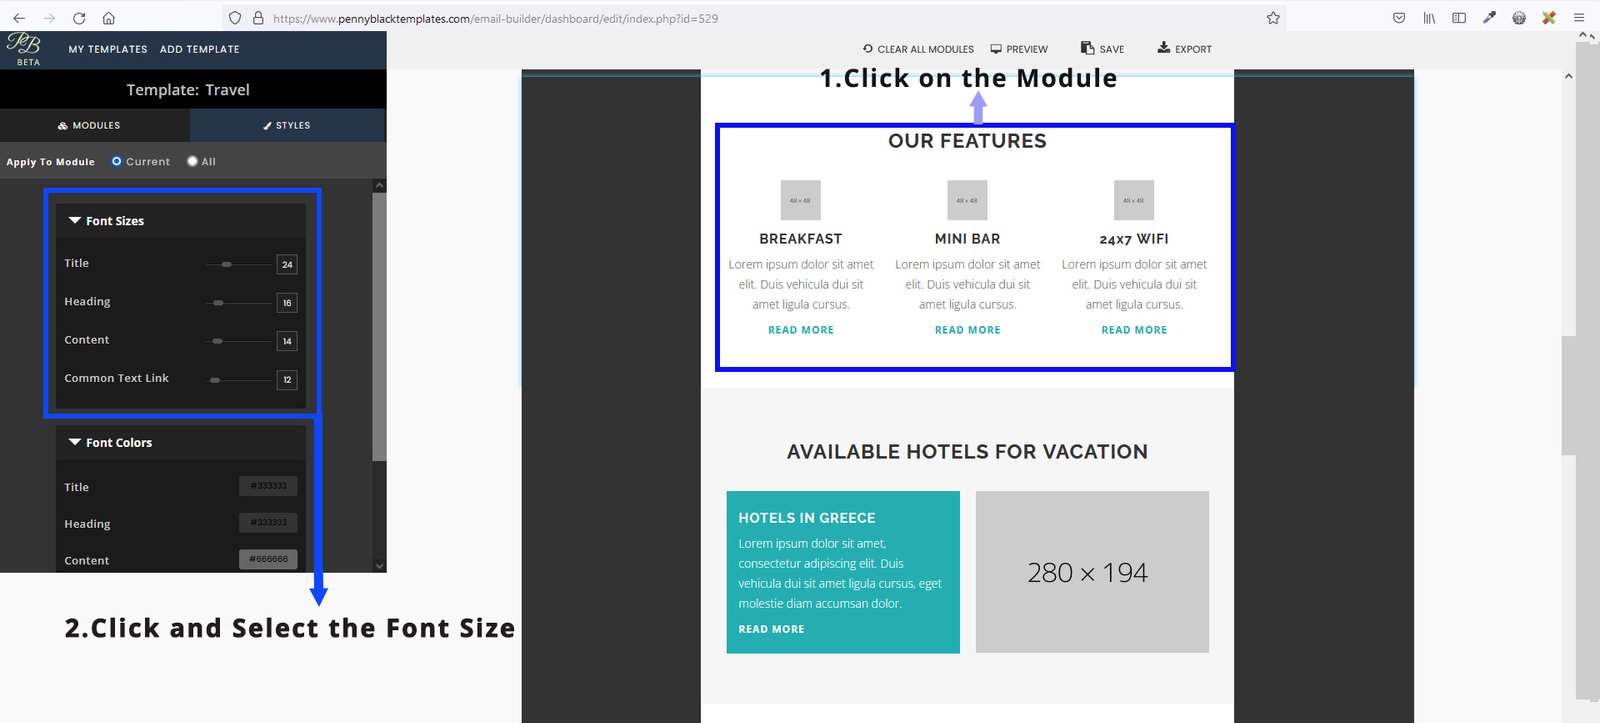
How To Edit Font Size?
- Click on the MODULE to change FONT SIZE
- Select the FONT SIZE in the left pop-up bar
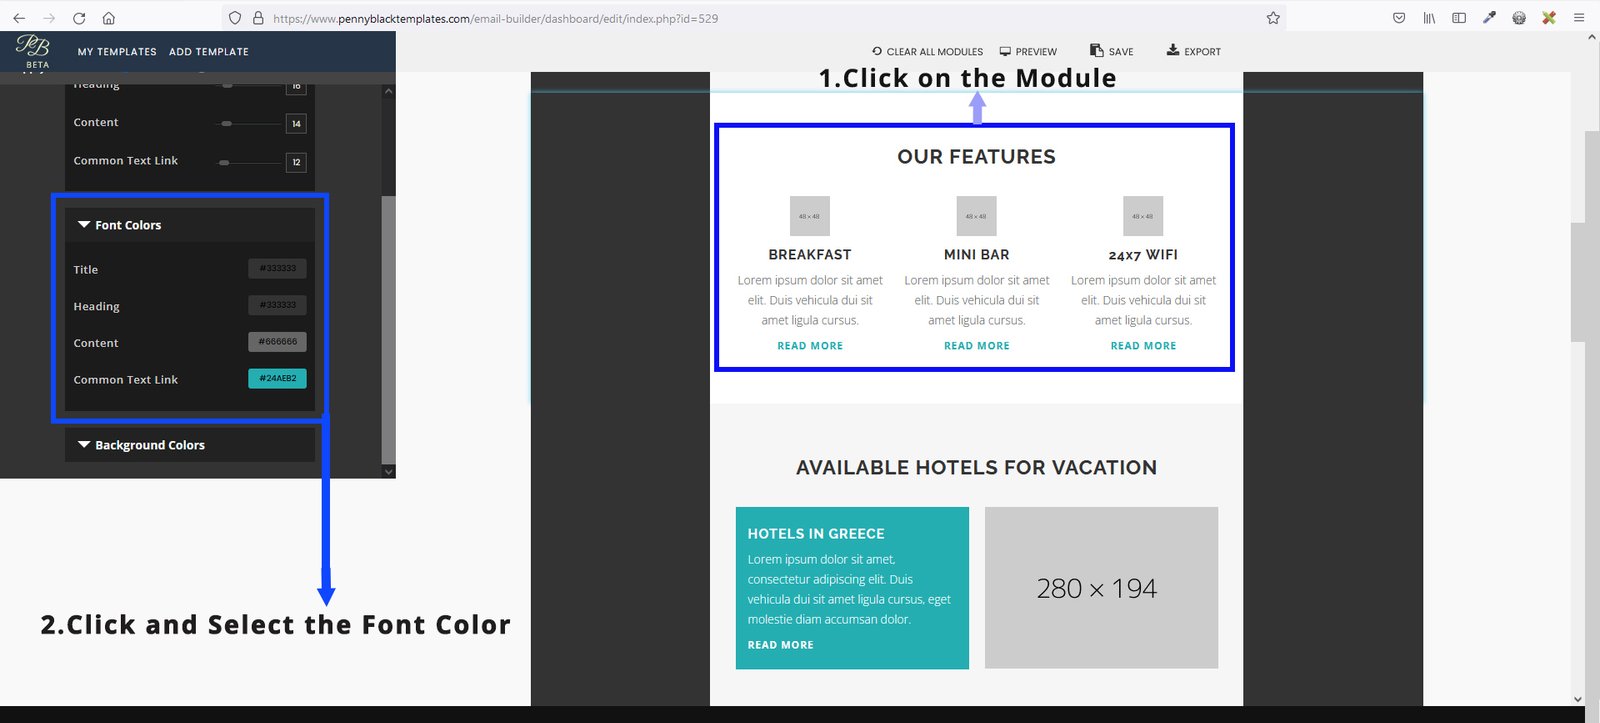
How To Edit The Font Color?
- Click on the MODULE to change FONT COLOR
- Select the FONT COLOR in the left pop-up bar
How To Edit The Background Color?
- Click on the MODULE to change BACKGROUND COLOR
- Select the BACKGROUND COLOR in the left pop-up bar

Access Stampready Builder
- You can find the Stamp-ready HTML file inside the HTML folder of the downloaded zip file named "stampready.html"
- In order to edit the Stamp-ready HTML file, you have to create the free account in http://stampready.net and then follow the bellow steps.
- Login to stampready site
- See right top > New Campaign
- Import Stampready HTML Template
- Once uploaded, you can see the HTML file preview. Click use template
- Edit template and apply the changes.
- SAVE TEMPLATE and SEND the Test Mail
- Note:
- Stampready is an online drag & drop builder which used to edit the template
- Export Option in stampready is not available for free registeration
- Demo Images are not included in the package.
Access Mailchimp Builder
- You can find the Mailchimp HTML file inside the HTML folder of the downloaded zip file named "mailchimp.html"
- In order to edit the Mailchimp HTML file, you have to create the account in https://mailchimp.com/ and then follow the bellow steps.
- Login to mailchimp site
- Go To--> Templates menu --> Create Template --> Import Html
- Import html "mailchimp.html"
- Edit Design and apply the changes.
- SAVE TEMPLATE and SEND the Test Mail
- Note:
- You can also import the Html file and create campaign which is customized and exported from Stampready Builder. But it is not editable by Mailchimp
- Import Option in Mailchimp is not available for free registeration
- Demo Images are not included in the package.
How To Upload File To Mailchimp?
- You can find the Mailchimp HTML file inside the HTML folder of the downloaded zip file named "mailchimp.html"
- In order to edit the Mailchimp HTML file, you have to create the account in https://mailchimp.com/ and then follow the bellow steps.
- Login to mailchimp site
- Go To--> Templates menu --> Create Template --> Import Html
- Import html "mailchimp.html"
- Edit Design and apply the changes.
- SAVE TEMPLATE and SEND the Test Mail
How To Remove Modules In Mailchimp?
- Clicking minus button will not remove existing modules. It will undo the duplication of modules only.
- To remove module you should not directly click the minus icon. Please follow the below steps
- Save the template in draft
- Run the email campaign
- Include the saved template.
- Now an eye icon will appear
- Using that icon you can hide modules
How To Edit The Image In Mailchimp?
- You can find the Mailchimp HTML file inside the HTML folder of the downloaded zip file named "mailchimp.html"
- In order to edit the Mailchimp HTML file, you have to create the account in https://mailchimp.com/ and then follow the bellow steps.
- Login to mailchimp site
- Go To--> Templates menu --> Create Template --> Import Html
- Import html "mailchimp.html"
- Edit Design and apply the changes.
- SAVE TEMPLATE and SEND the Test Mail
How To Edit The BG Image In Mailchimp?
- You can find the Mailchimp HTML file inside the HTML folder of the downloaded zip file named "mailchimp.html"
- In order to edit the Mailchimp HTML file, you have to create the account in https://mailchimp.com/ and then follow the bellow steps.
- Login to mailchimp site
- Go To--> Templates menu --> Create Template --> Import Html
- Import html "mailchimp.html"
- Edit Design and apply the changes.
- SAVE TEMPLATE and SEND the Test Mail
How To Create Live Image URL In Mailchimp?
- To change the BG image, you can not upload the image from your local machine. You have to replace live image URL. In that case you need a live image URL. Please follow the below step to create a live image URL.
- Click on any image of the template
- Click "Replace" option
- Click View Detail drop down
- Edit Design and apply the changes.
- Choose Copy URL option
Access Campaign Monitor Builder
- You can find the Campaign Monitor HTML file inside the HTML folder of the downloaded zip file named "campaign-monitor.html"
- In order to edit the Campaign Monitor HTML file, you have to create the account in https://www.campaignmonitor.com/ and then follow the bellow steps.
- Login to Campaign Monitor site
- Go to --> Create Campaign ---> Import Html [under More Options]
- Import html "campaign-monitor.html"
- Edit Design and apply the changes.
- SAVE TEMPLATE and SEND the Test Mail
- Note:
- You can also import the Html file and create campaign which is customized and exported from Stampready Builder. But it is not editable by Campaign Monitor
- Demo Images are not included in the package.
Access Mymail Builder
- You can find the Mymail zip file inside the mymail folder of the downloaded zip file
- In order to edit the Mymail file, you should have the mymail plugin in the Wordpress website and then follow the bellow steps.
- Login to your Wordpress site
- Go to --> Admin Panel --> Newsletter --> Templates --> Upload the mymail zip file
- After uploaded, you can view this template under "New Campaign" section of MyMail plugin.
- Edit Design and apply the changes.
- Note:
- Demo Images are not included in the package.