Gym
- Responsive Multi Page WordPress Theme
- By: pennyblacktemplates
- Email: support@pennyblacktemplates.com
- Version 1.0
Thank you for purchasing my theme. If you have any questions that are beyond the scope of this help file, please feel free to email via my user page contact form here. Thanks so much!
About Gym
- Gym - Responsive Multi Page WordPress Theme
- Pages are clean and simple with easily customizable.
- Multi pages with Blog pages.
- Suitable for Bussiness categories.
Features
- Gym - Responsive Multi Page WordPress Theme
- Multi pages with Blog pages.
- Responsive Layout
- Child Theme Support
- Bootstrap 4.x Framework
- Elementor Page Builder
- Compatible with Major web browsers
- Compatible with Major Mobiles
- W3C html Error free
- Easy to Customize
Theme Install
Follow the below steps to install Gym theme into your WordPress.
You will find two zip folder Gym.zip and Gym-child.zip
There are two ways to install the theme into WordPress
- Installing through WordPress admin dashboard
- Uploading WordPress through FTP
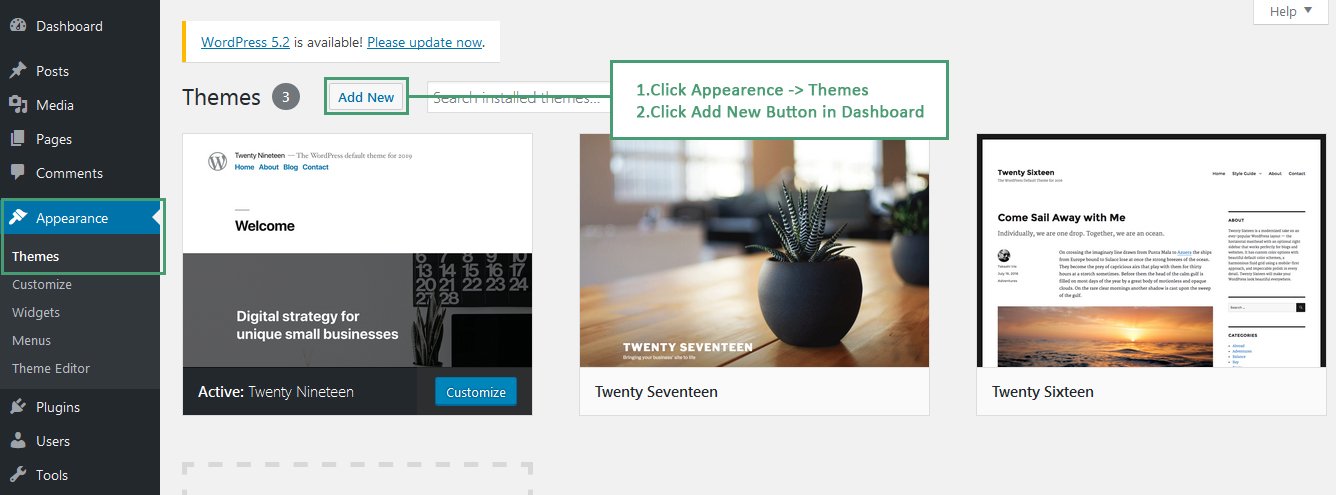
Installing through WordPress admin dashboard
- Login into your WordPress admin
- Go To: Appearance -> Themes
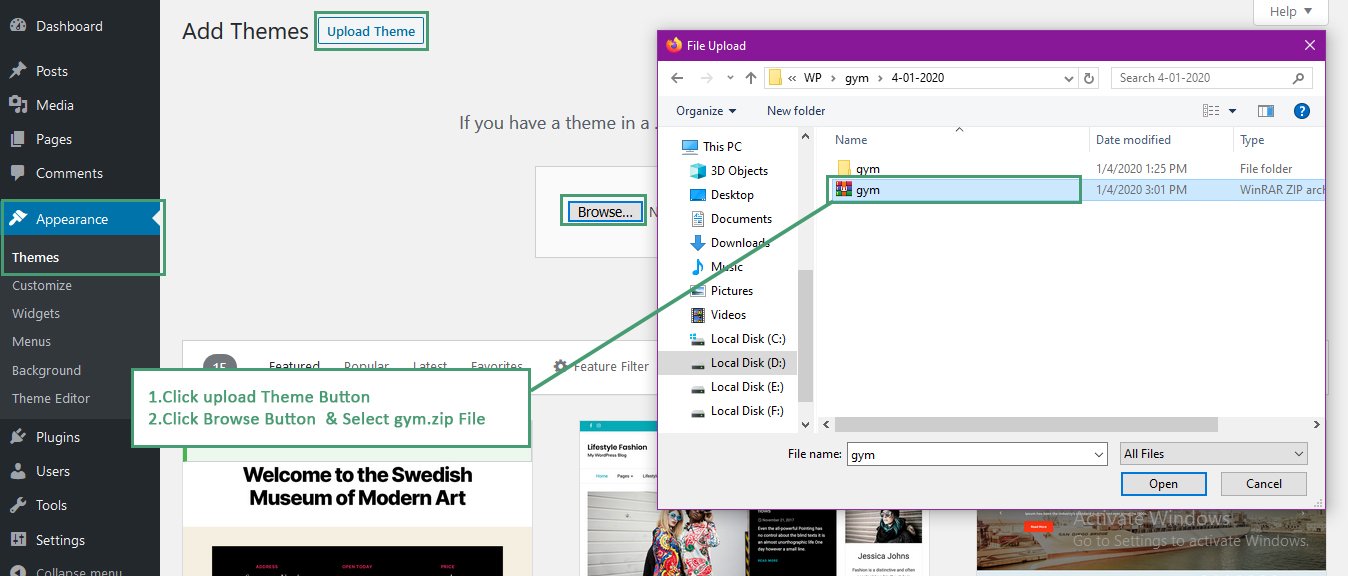
- By clicking "Add New", upload Gym.zip theme
- Also upload Gym-child.zip theme
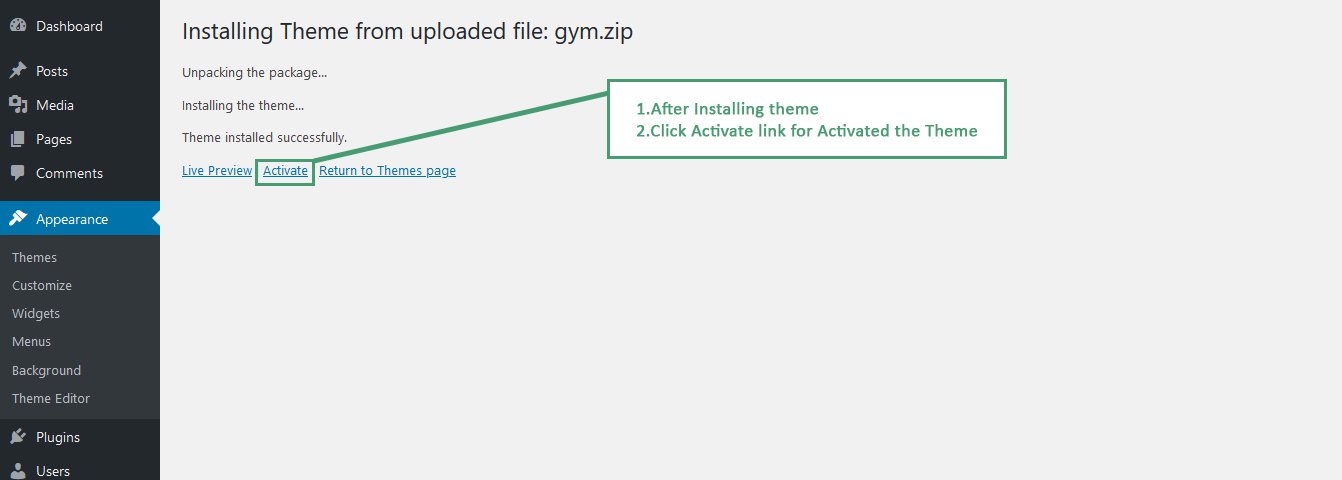
- Once uploaded done, click Activate link in Gym-child. Now theme activated for your use.
SCREENSHOT - 1
SCREENSHOT - 2
SCREENSHOT - 3
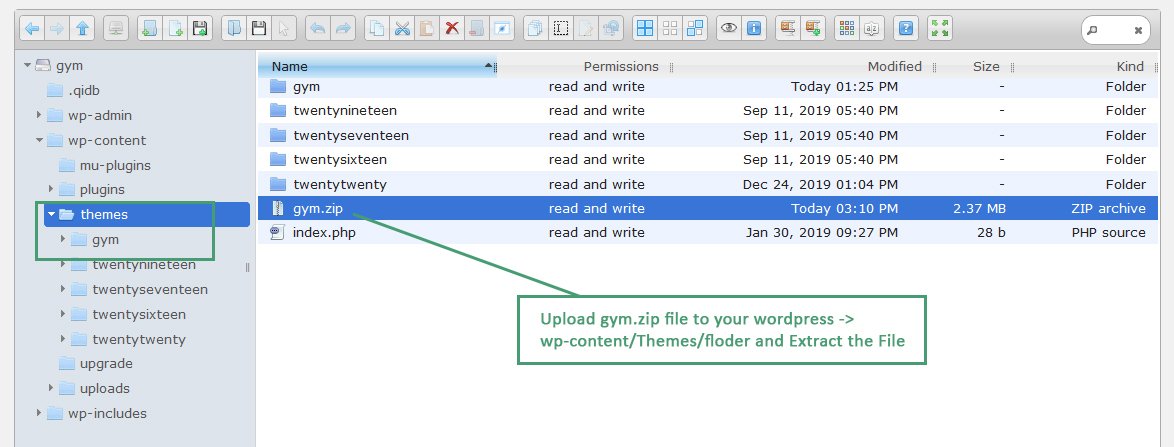
Upload through FTP
- Extract both zip files Gym.zip and Gym-child.zip
- Upload this extracted files into WordPress installed folder wp-content/themes
- Login into the WordPress admin dashboard.Go To: Appearance -> Themes
- Now Activate the theme
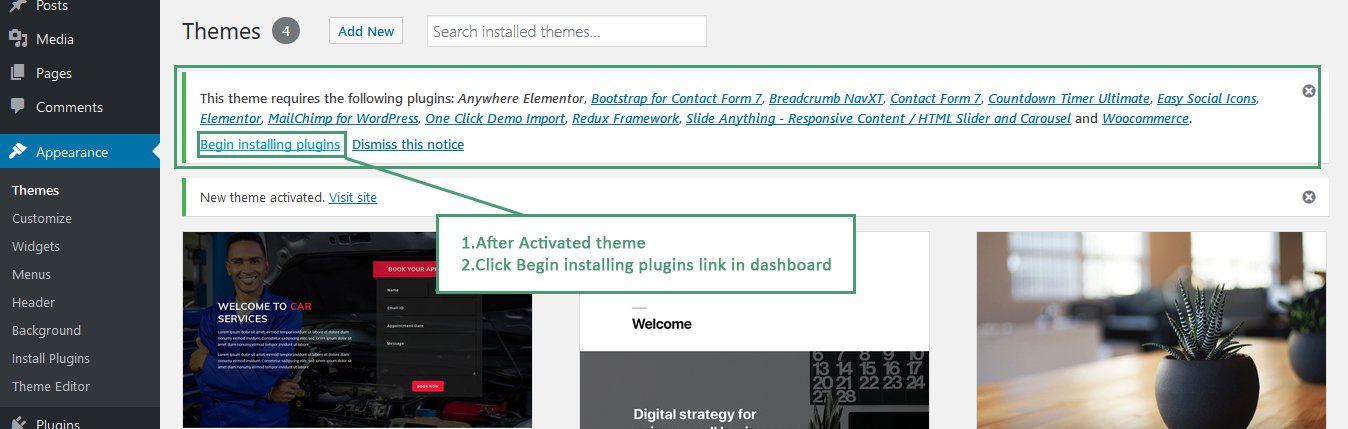
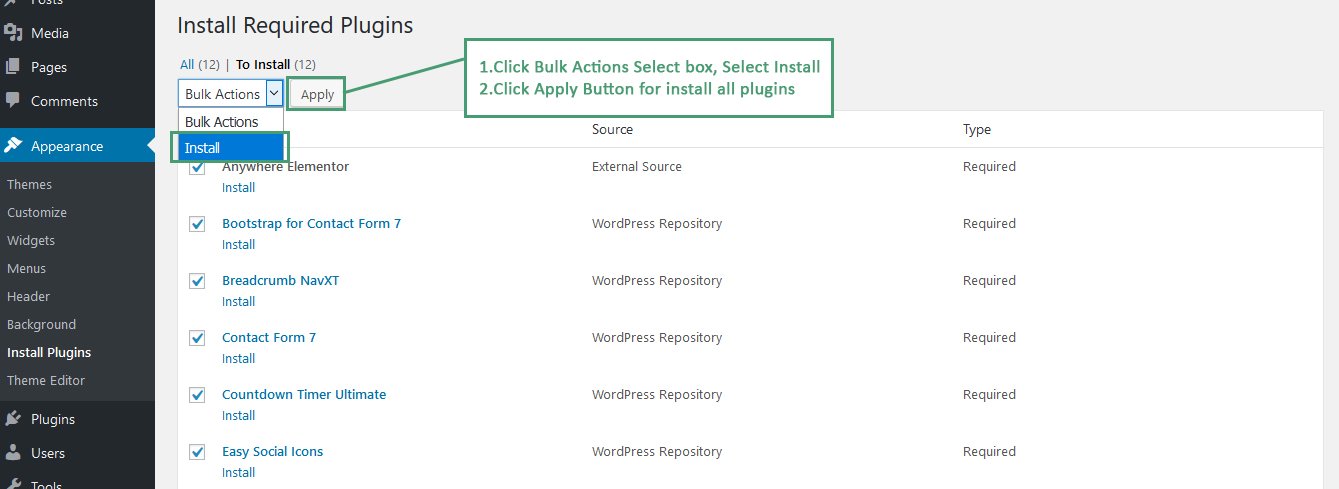
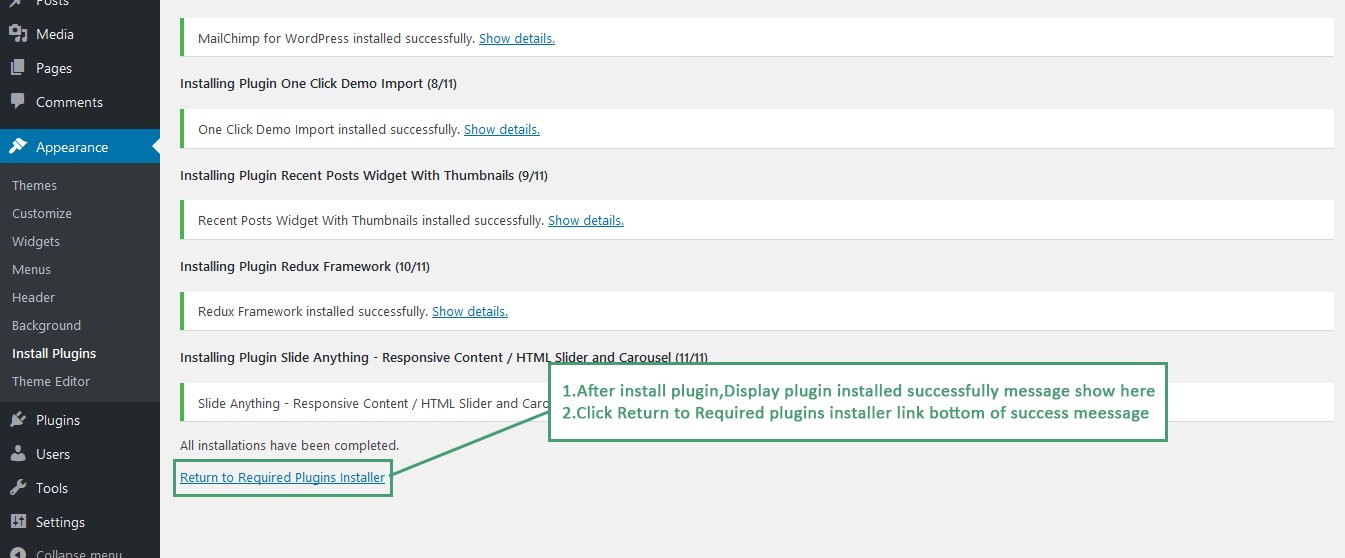
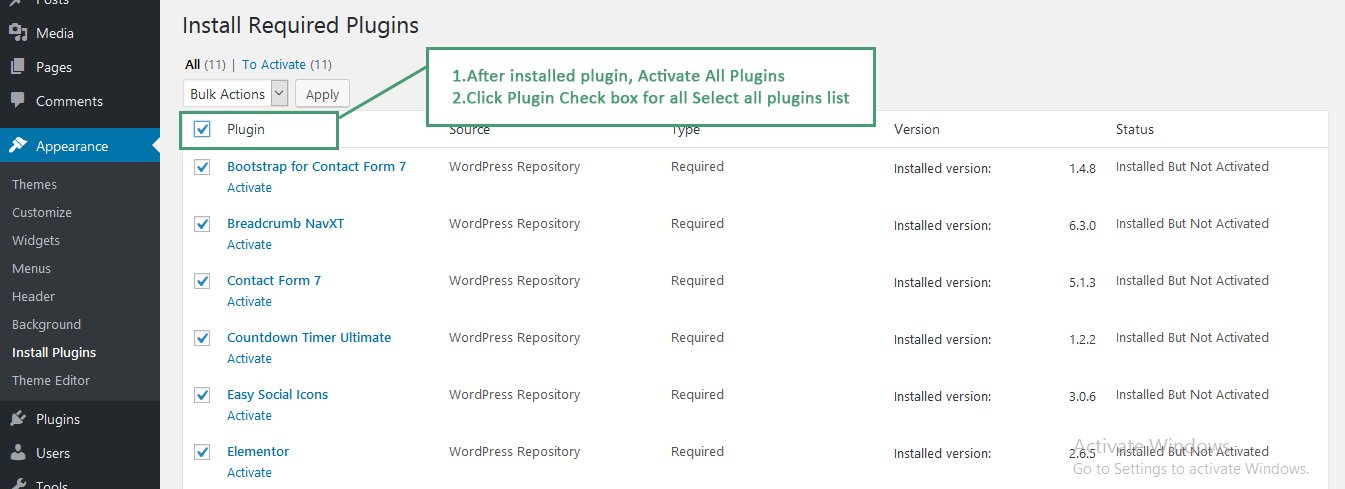
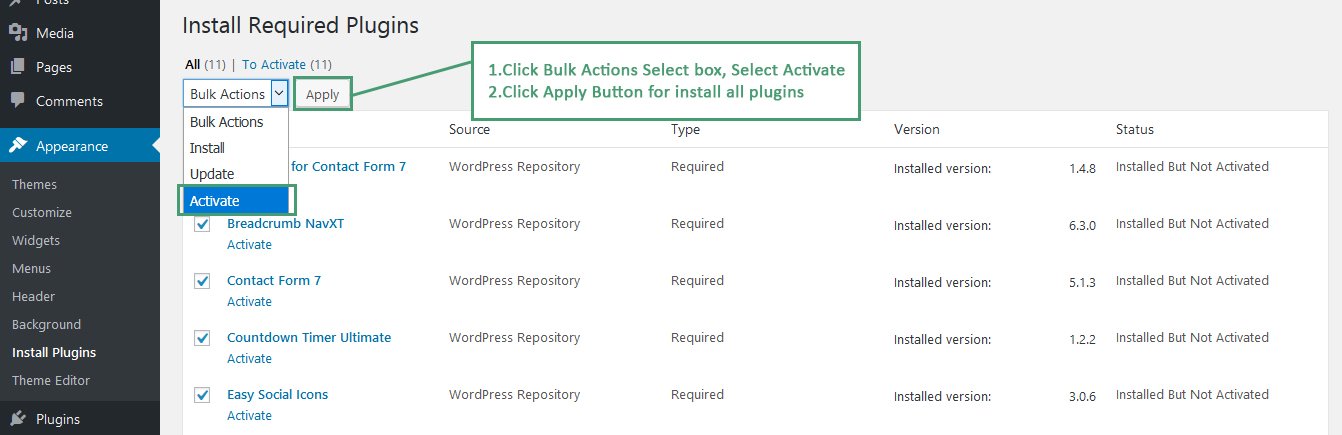
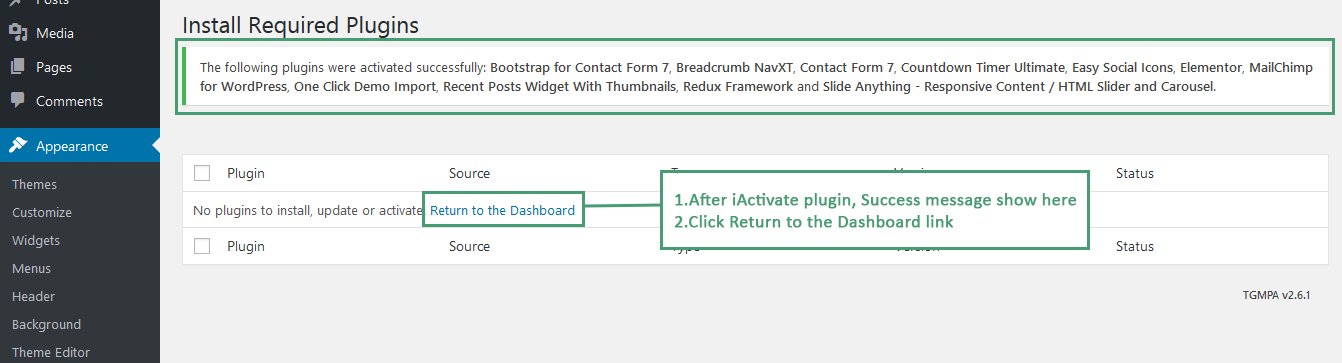
Plugin Install & Activation
Go To Plugin Section of WordPress admin and activate all the required plugins - Elementor, Give - Donation Plugin, Contact Form 7, Slide Anything - Responsive Content / HTML Slider and Carousel, Bootstrap for Contact Form 7, Instagram Feed, Countdown Timer Ultimate, Redux Framework, Breadcrumb NavXT and MailChimp for WordPress, One Click Demo Importer
SCREENSHOT - 1
SCREENSHOT - 2

SCREENSHOT - 3
SCREENSHOT - 4
SCREENSHOT - 5
SCREENSHOT - 6
SCREENSHOT - 7
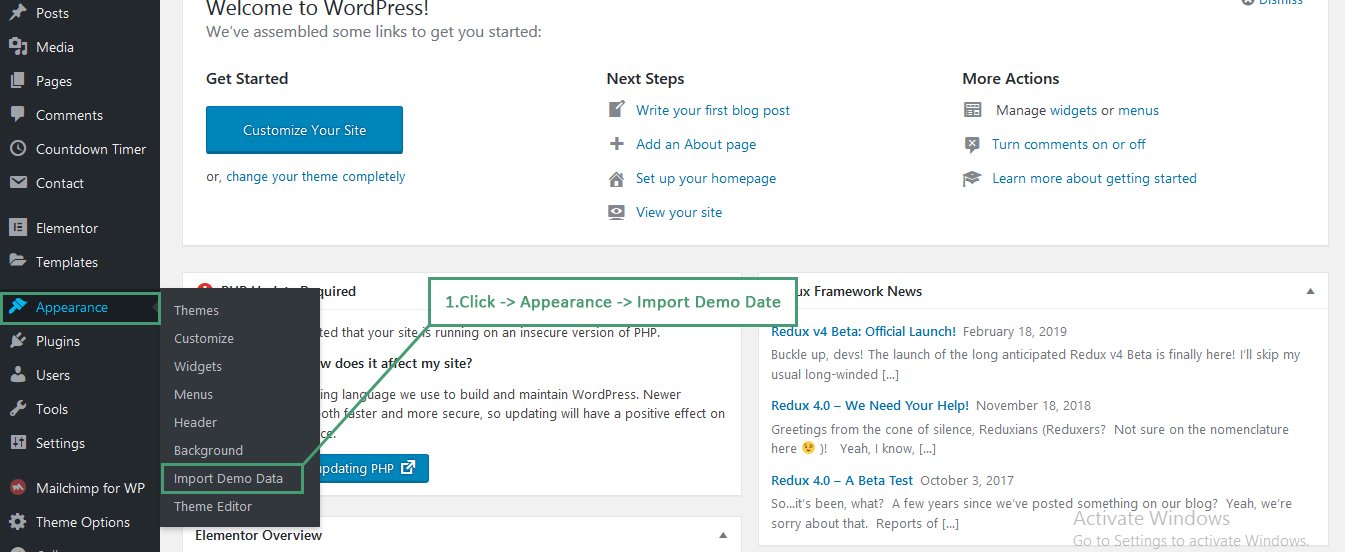
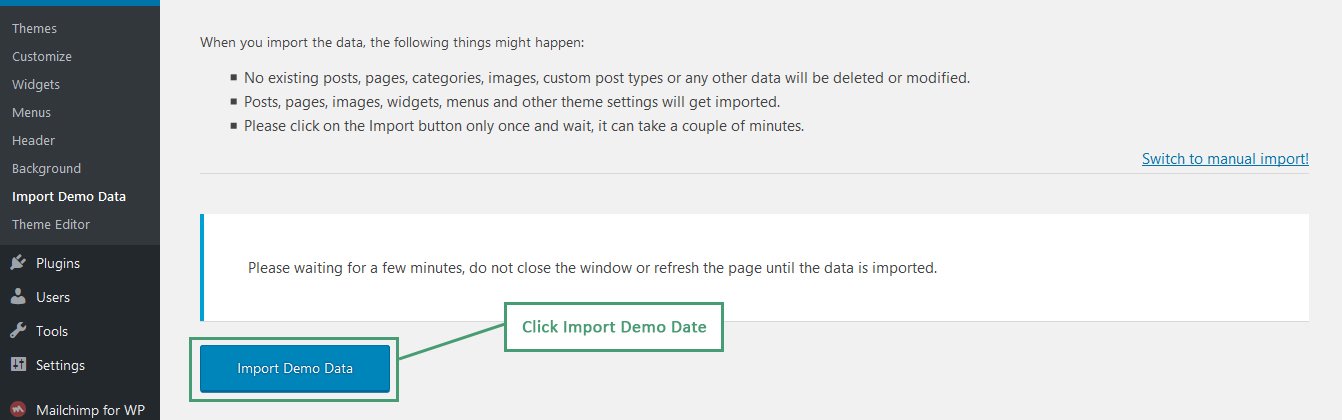
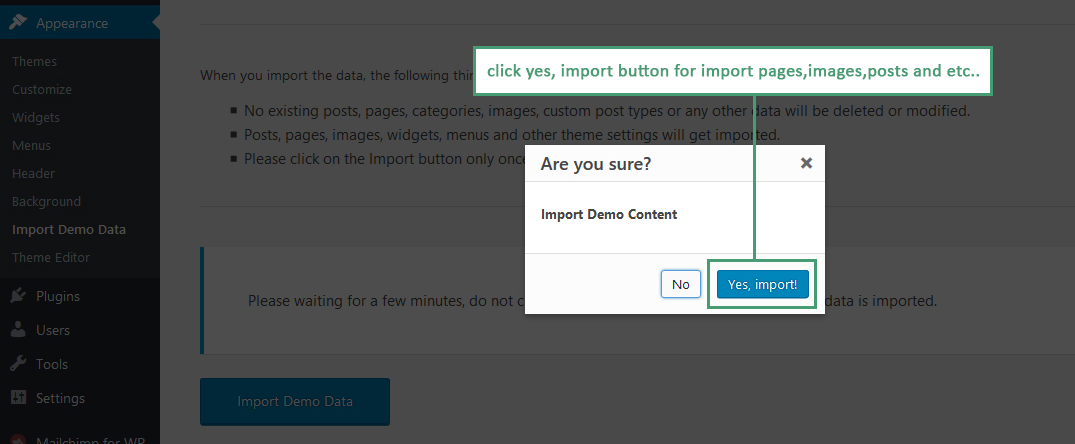
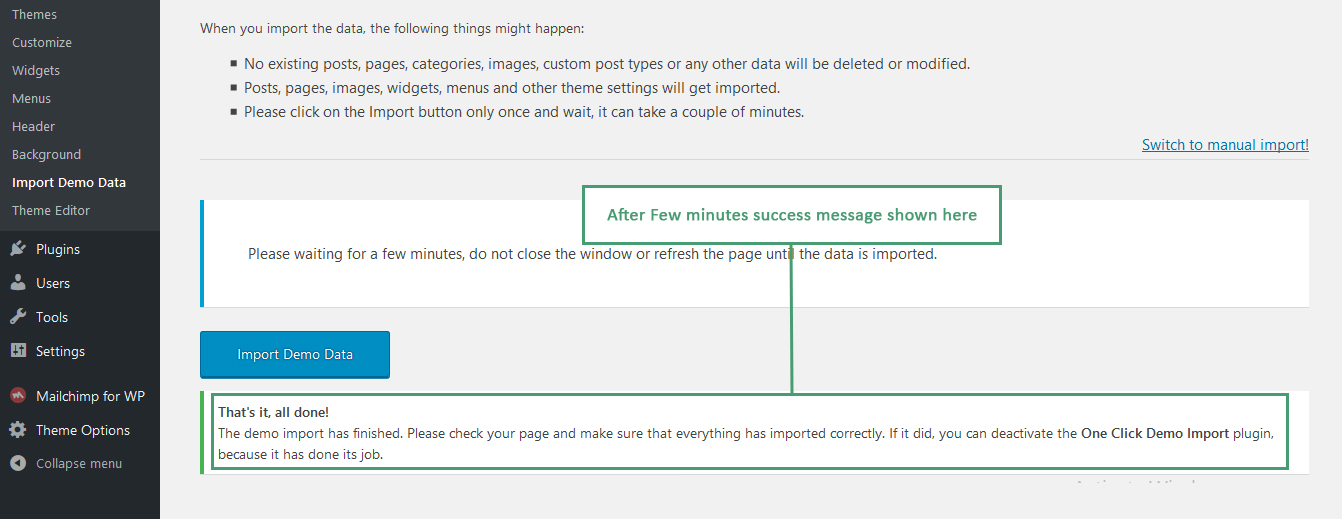
One Click Demo - Setup
Follow below steps to install demo content.
- Login to WordPress Admin
- Go To Appearance -> Import Demo Data
- Click Import button to install demo content. Wait for sometime to import the demo content.
- Once you received the message "Imported", Demo content has been set
SCREENSHOT - 1
SCREENSHOT - 2
SCREENSHOT - 3
SCREENSHOT - 4
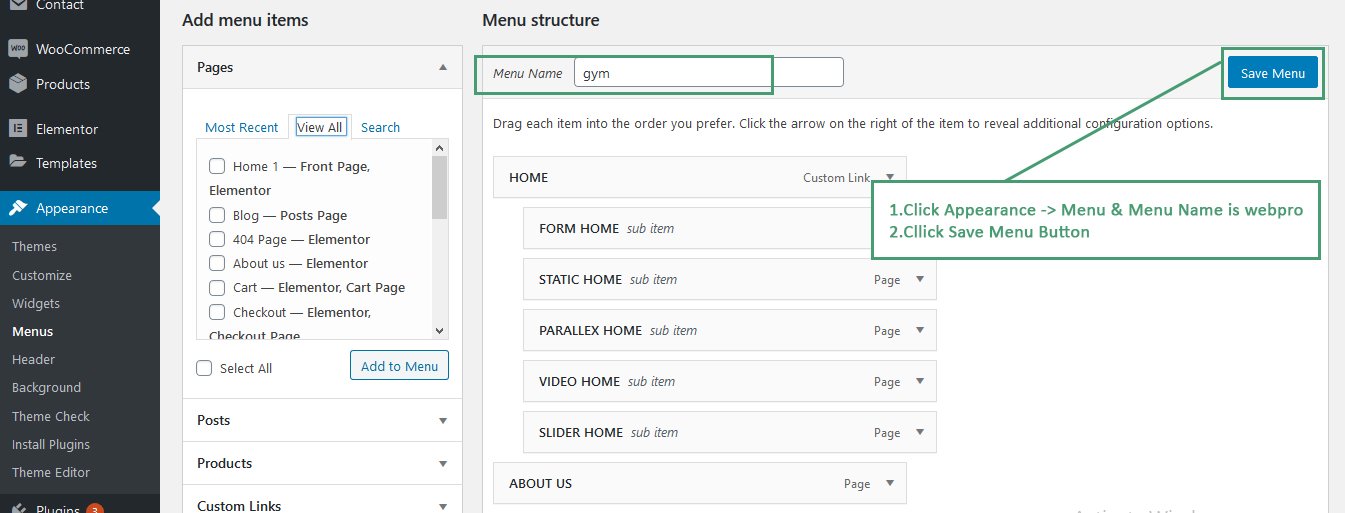
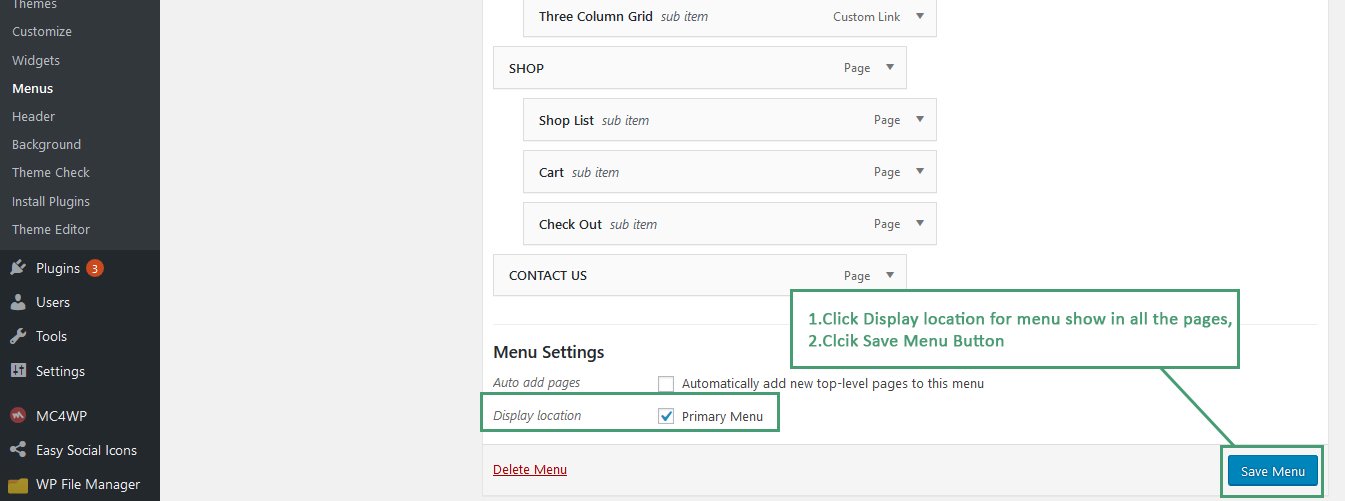
Menu, Front and Blog Pages - Setup
Follow below steps to set Menu, Front and Blog Pages.
- Login to WordPress Admin
- For menu setup, Go To Appearance -> Menus. Select first two options Automatically add new top-level pages to this menu & Primary Menu to display the menu
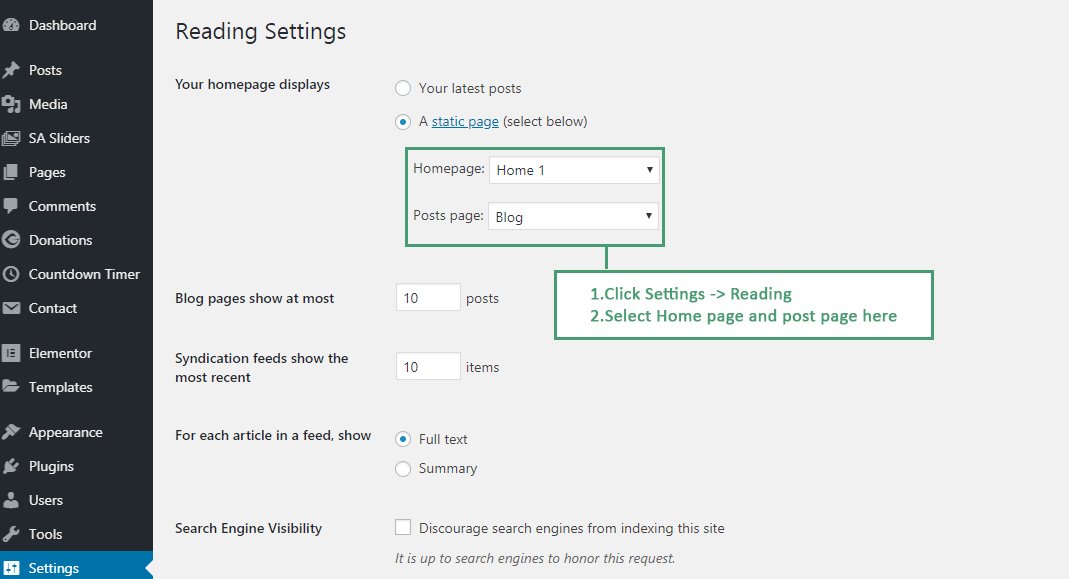
- To set front page, Go To Settings -> Reading. Then select Front-page option.
- To set blog page, Go To Settings -> Reading. Then select Posts page option.
SCREENSHOT - 1
SCREENSHOT - 2
SCREENSHOT - 3
Theme Options - Redux Framework
We've used Powerful Redux Framework to manage settings. Inside theme options section of WordPress admin, you can find lot of settings to control your webpages.
Redux Video Tutorial: https://www.youtube.com/watch?v=lMZDecAyl7k
Elementor Page Builder
We've used Elementor Page Builder to built pages which is more powerful and easily custiomizable.
Elementor Video Tutorial: https://www.youtube.com/watch?v=6u45V2q1s4k
Theme Options - Theme Color
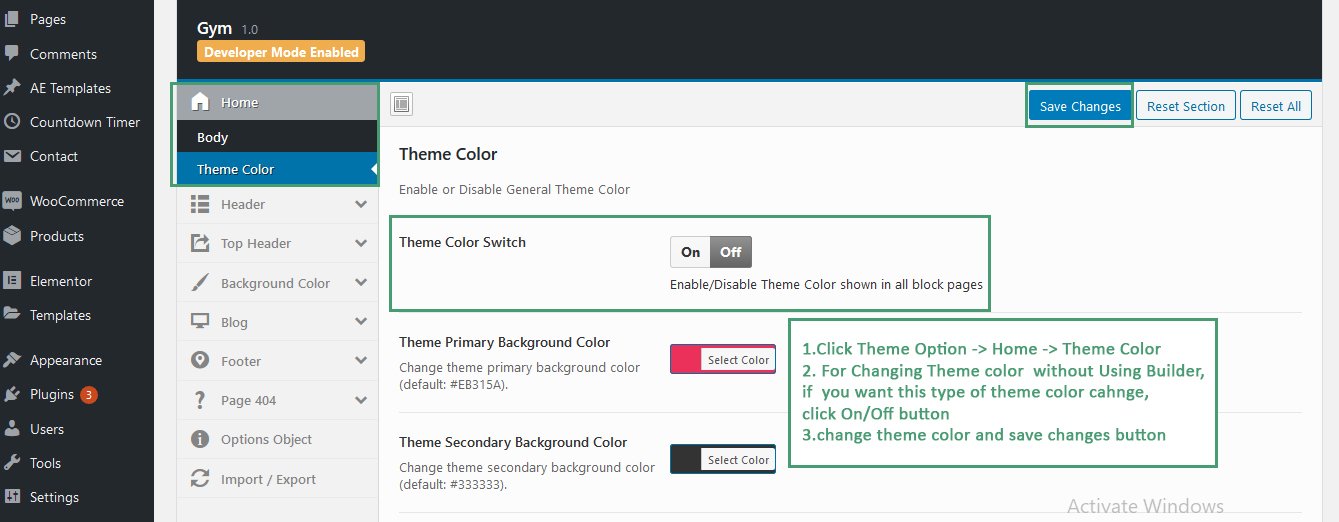
Follow below steps to Theme Options - Theme Color
- Login to WordPress Admin
- Go To Theme Options
- Click Home->Theme Color
- For Changing Theme color without using builder
SCREENSHOT - 1
Count Down Plugin
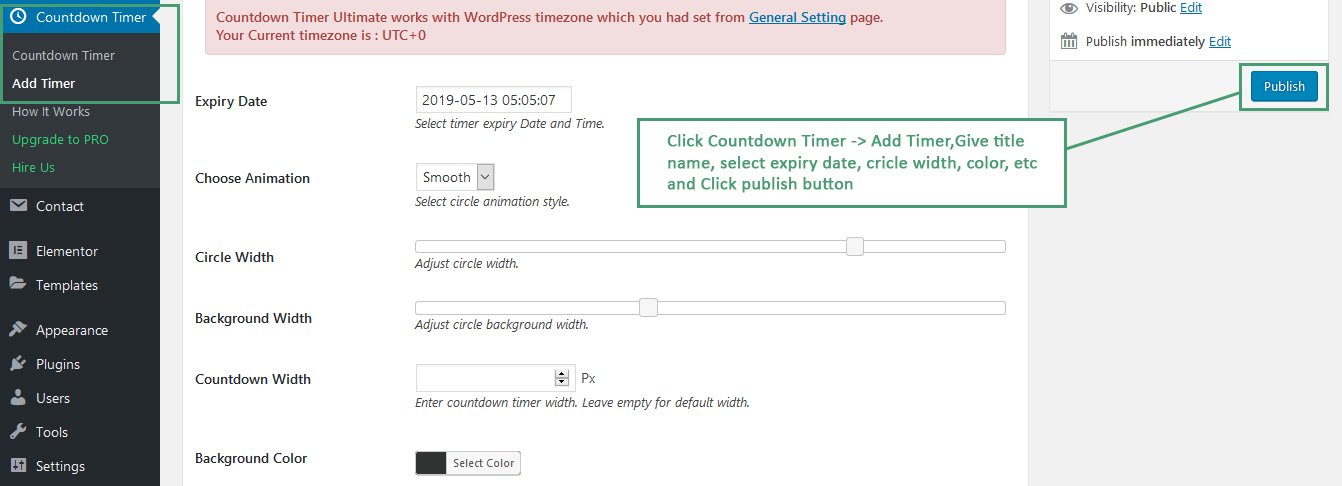
Follow below steps to Countdown Timer.
- Login to WordPress Admin
- Go To Countdown Timer
- Click Add Timer
- Select date,month,year of expiry date
SCREENSHOT - 1
SCREENSHOT - 2
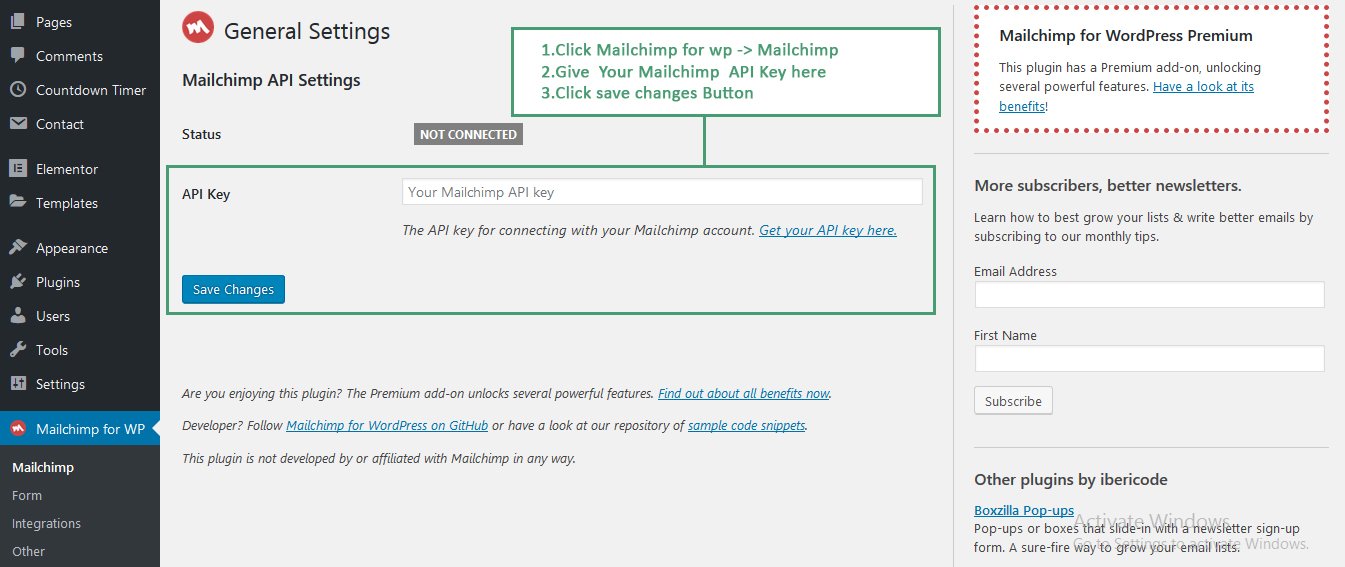
Mailchimp for WP
Follow below steps to Mailchimp Subscribe form
- Login to WordPress Admin
- Go To Mailchimp for WP
- Click Form
- Create form here
SCREENSHOT - 1
SCREENSHOT - 2

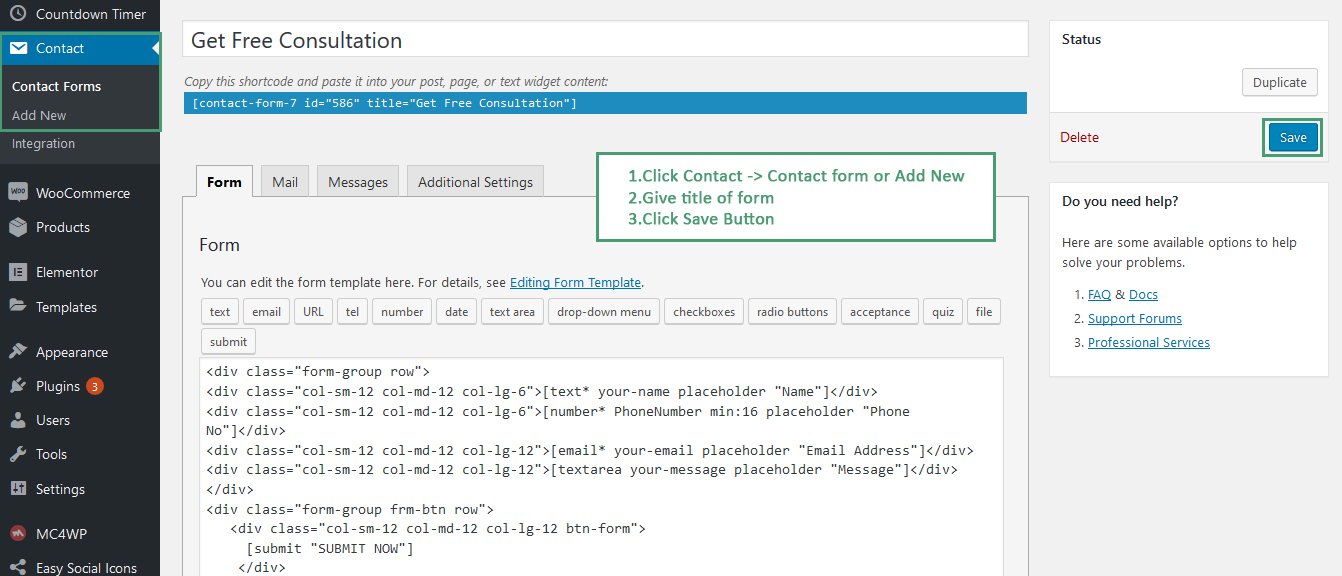
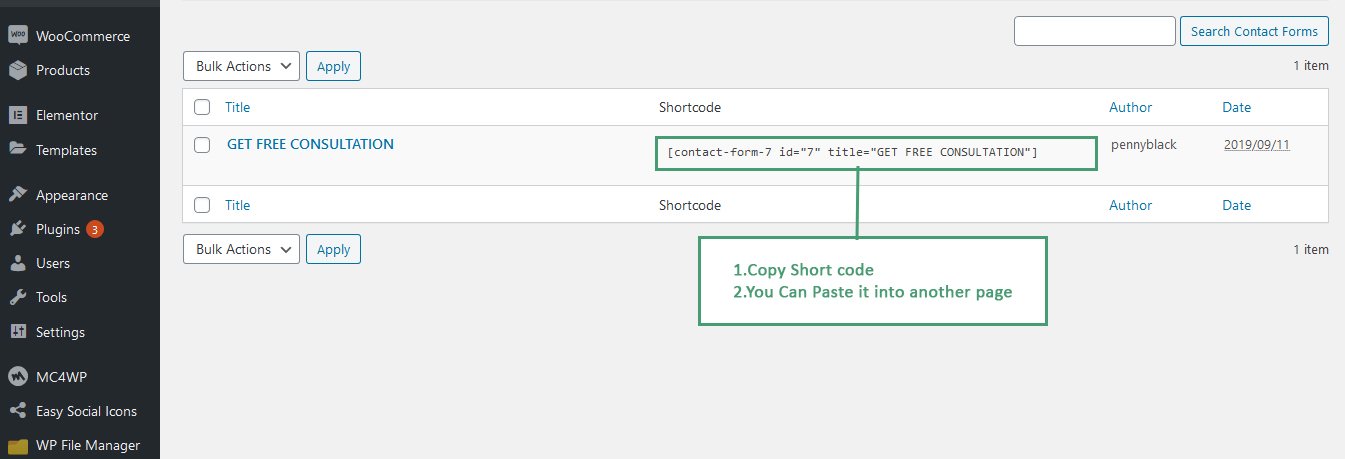
Contact Form
Follow below steps to Contact Form.
- Login to WordPress Admin
- Go To Contact Form
- Click contact form or Add New Form
- Create form and Copy shortcode.you can paste it into another page.
SCREENSHOT - 1
SCREENSHOT - 2
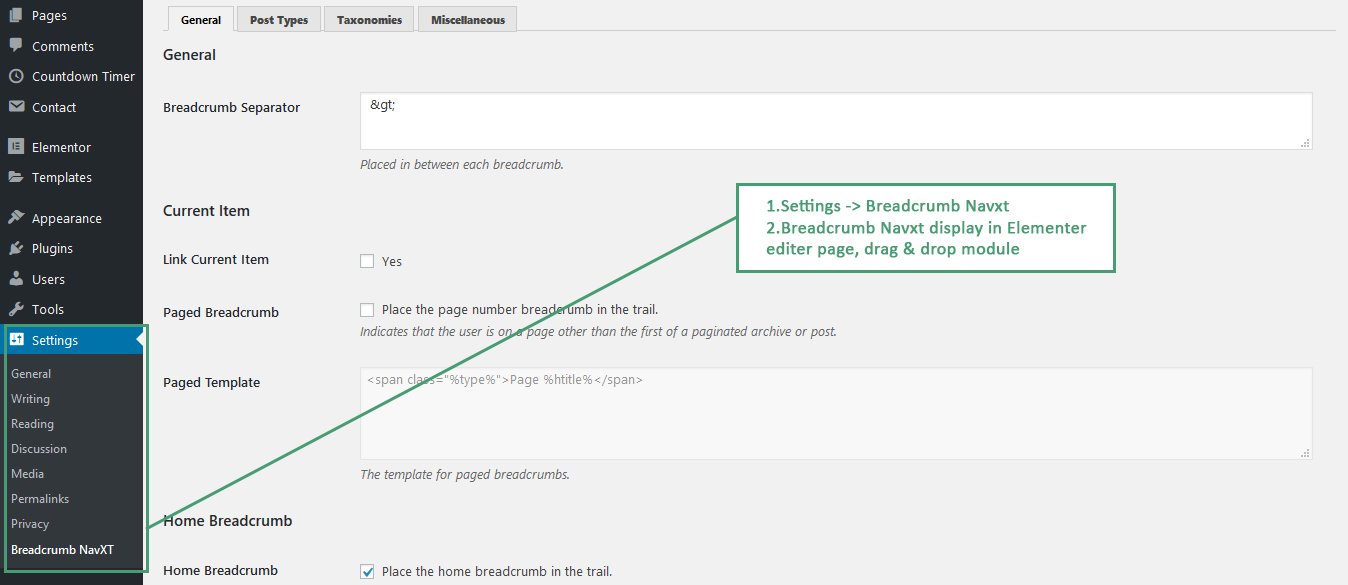
Breadcrumb Navxt
Follow below steps to Breadcrumb Navxt
- Login to WordPress Admin
- Go To Settings->Breadcrumb Navxt
- Breadcrumb Navxt Display in Elementor Editor page
SCREENSHOT - 1
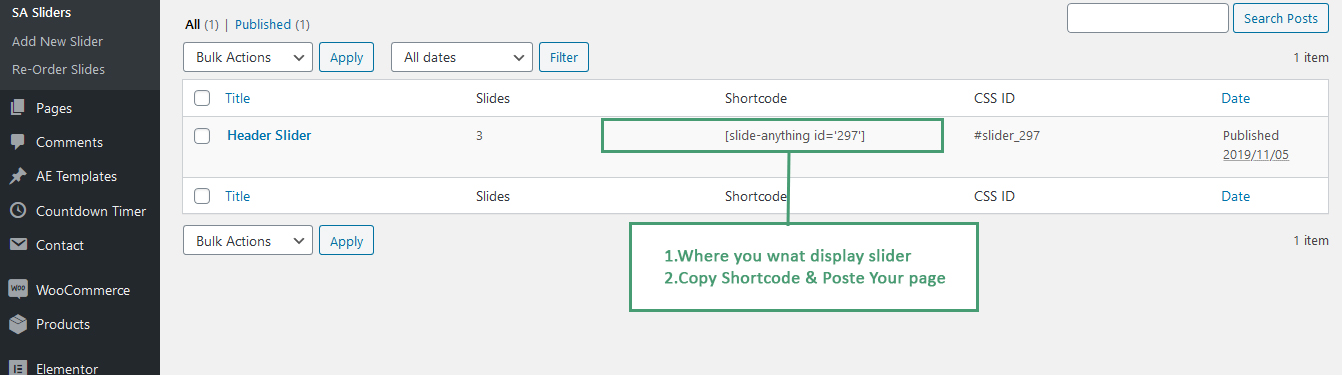
Slide Anything - Responsive Content / HTML Slider and Carousel
Follow below steps to Slide Anything - Responsive Content
- Login to WordPress Admin
- Go To SA Sliders
- Click SA Slider
SCREENSHOT - 1
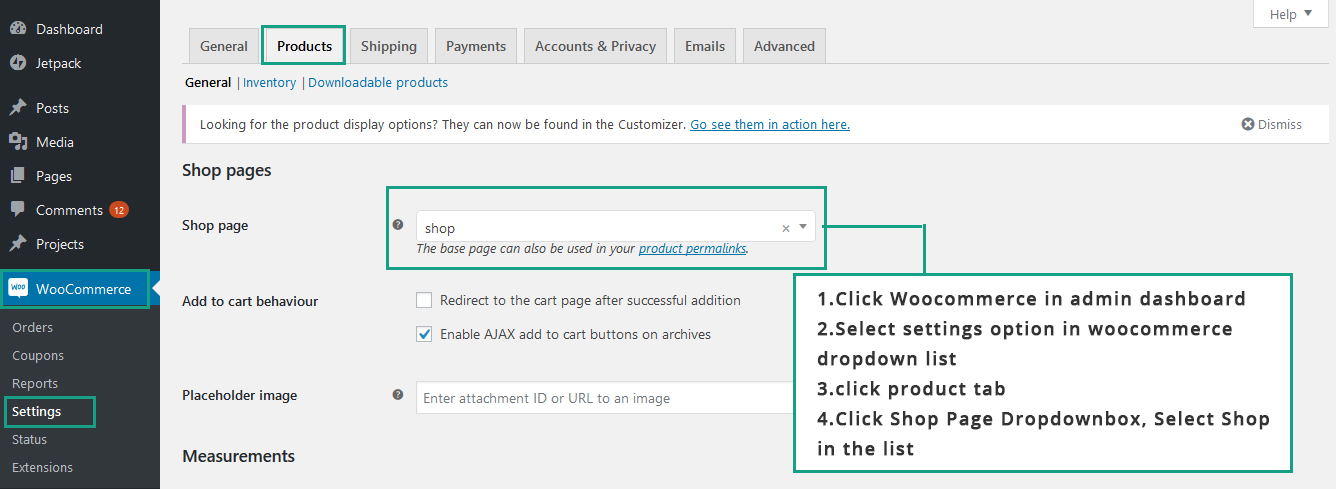
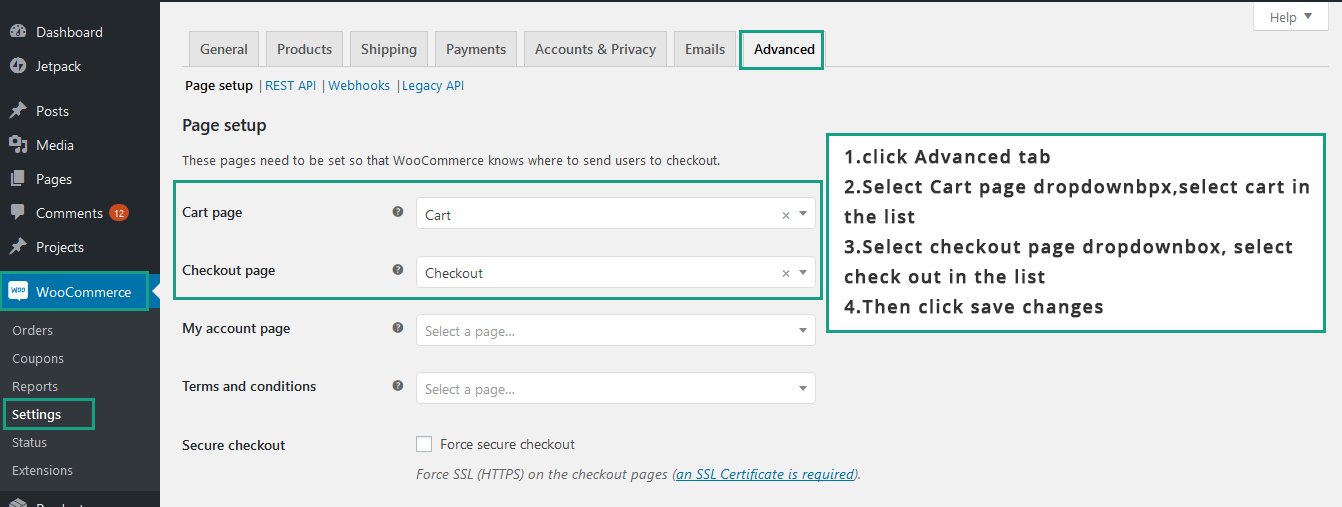
Woocommerce
Follow below steps to Woocommerce
- Login to WordPress Admin
- Go To Woocommerce
- Click settings->select product tab->Select Shop page
- Click settings->select Advanced tab->Select cart,checkout and My account page
SCREENSHOT - 1
SCREENSHOT - 2
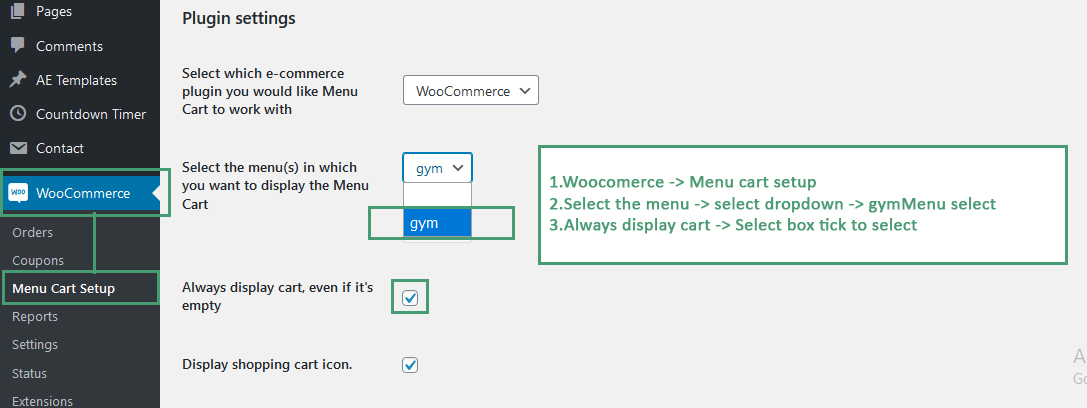
Woocommerce - Menu Cart Setup
Follow below steps to Woocommerce
- Login to WordPress Admin
- Go To Woocommerce -> Menu Cart Setup
SCREENSHOT - 1
Blogs
Following Blog Types available in this Gym Theme:
- Standard
Following Blog Pages available in this Gym Theme:
Following options available for Single Post,
- Single post - left sidebar
- Single post - right sidebar
- Single post - full-width(no sidebar)
Following options available for Post Lists
- Left sidebar
- Right sidebar
- Two Column Grid Layout
- Three Column Grid Layout
- Full-width(no sidebar)
Widgets
Following widgets available for this Gym Theme:
- Search
- Categories
- Recent Posts
- Tag Cloud
Sources and Credits
Easy Social Icons
Follow below steps to Easy Social Icons.
SCREENSHOT - 1
SCREENSHOT - 2